
20 Real Use Cases for Image Creation with Nano Banana 2 (With Exact Prompts)
The only prompt playbook you need to turn Google's free image AI tool into your creative studio.

🍌 Nano Banana 2 Just Killed Half Your Design Budget.
Google released it quietly.
No keynote. No launch event. No “one more thing.”
Just dropped it inside Gemini and walked away.
Nano Banana 2. Free. State-of-the-art image generation.
Your answer to almost all graphic design needs.
Anyone can now create social media content, ad images, infographics, slides, headshots in any style, product images and about 15 other things I’m going to show you in this guide.
Photorealistic generation. Character consistency across images. Upscaling to 4K. Readable text inside images.
All free. All inside one tool.
But here’s the thing, most people will open it, type “a cool picture of a dog,” get a nice result, and never touch it again.
The gap between a casual user and someone who actually uses this for work?
Knowing what’s possible. And having the right prompt structure.
So I put together 20 specific scenarios you can create with Nano Banana 2; organized not as a flat list, but the way you’d actually use them in a real workflow.
Each one comes with a copy-paste prompt template I built from scratch.
Save this. Bookmark it. Come back to it every time you need to make something.
Set it up in 30 seconds.
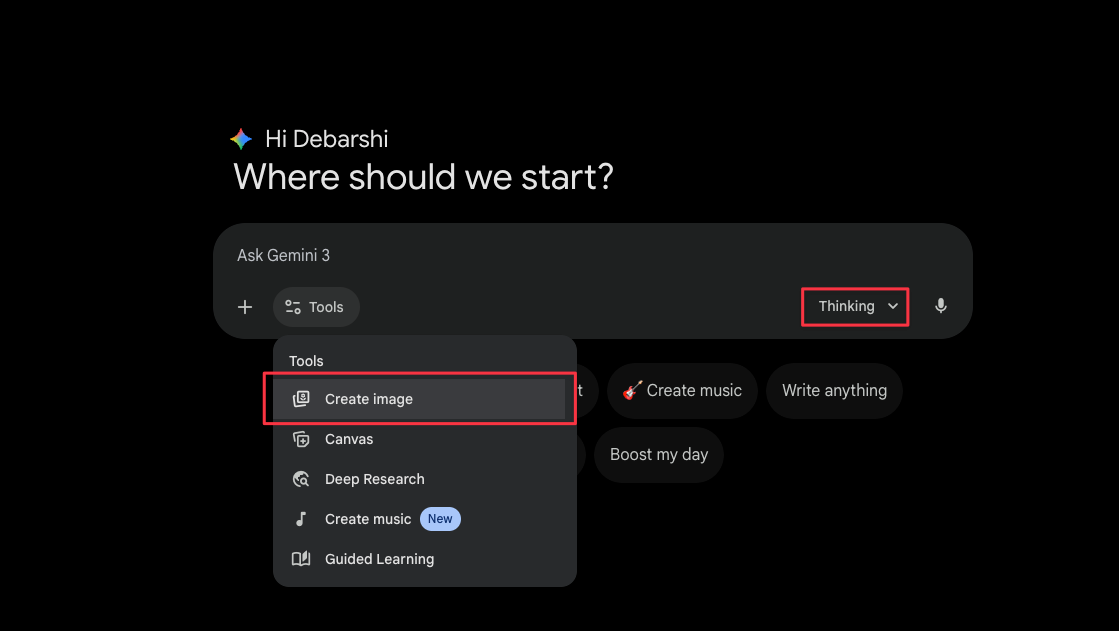
Go to gemini.google.com.
Click “Tools” → “🍌 Create image.”
Switch to the “Thinking” model.

Done.
That’s the entire setup. Now let’s talk about what you can actually build with this.
Part 1: Stop generating new images. Use existing ones.
You (or your client) already have hundreds of photos.
On your phone, in client folders, buried in Google Drive that are almost good enough. Almost sharp enough. Almost the right color. Almost ready for that listing or that post.
Nano Banana 2 doesn’t just create from scratch.
It fixes what already exists. And that’s where the fastest wins are.
Start here before you generate a single new image.
1. Blurry photo to Editorial sharp.
Every client has that one photo. Taken at an event. Slightly out of focus.
“Can you do something with this?”
Now you can.
Copy this prompt
Enhance this photo to look like it was shot on a professional DSLR with perfect focus. Preserve every element in the frame — same people, same objects, same layout. Only fix the sharpness and clarity.Upload the blurry image. Run the prompt. That’s it.
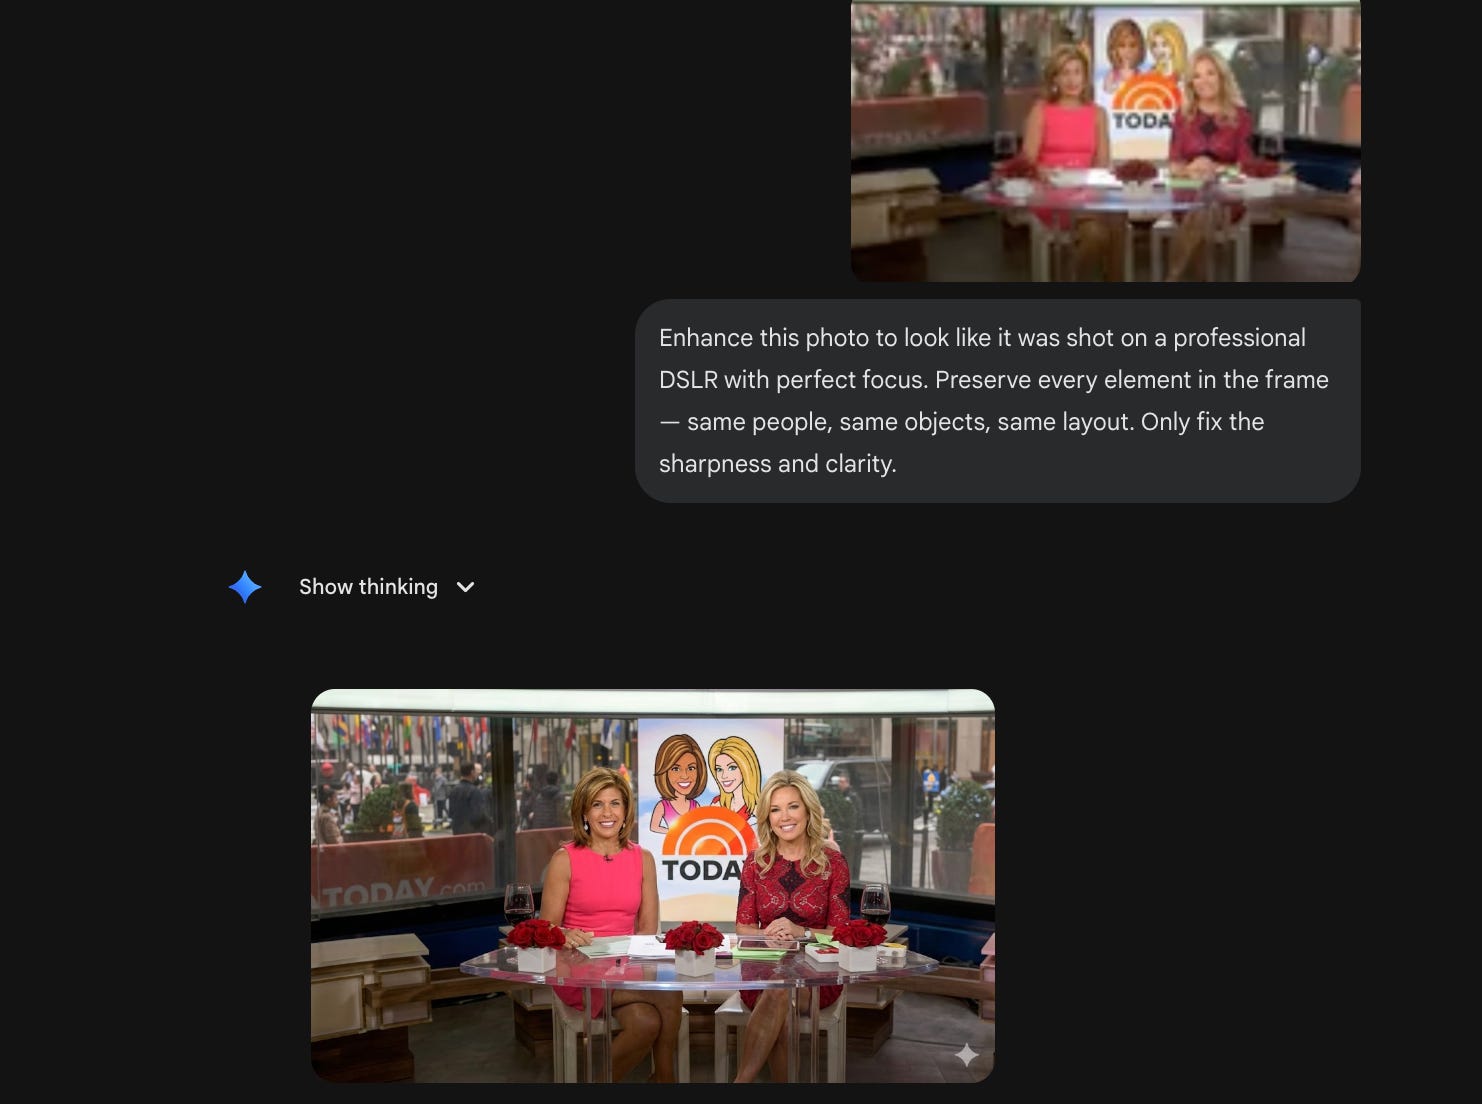
No Photoshop sharpening stack. No plugins.
2. Low-res to 4K.
Client sends you a super low quality logo that you can’t use on a website or for branding on social media. A team photo from 2016. A product image that looks like it was screenshotted from WhatsApp. Or a personal photo from their phone.
Now, how do you make it high resolution?
Simple! Use the prompt below.
Copy this prompt (update the text inside [ ] as per your requirement)
Increase the resolution of this image to [2k / 4k] while preserving all original details, textures, and colors. No artistic changes, just make it crisper.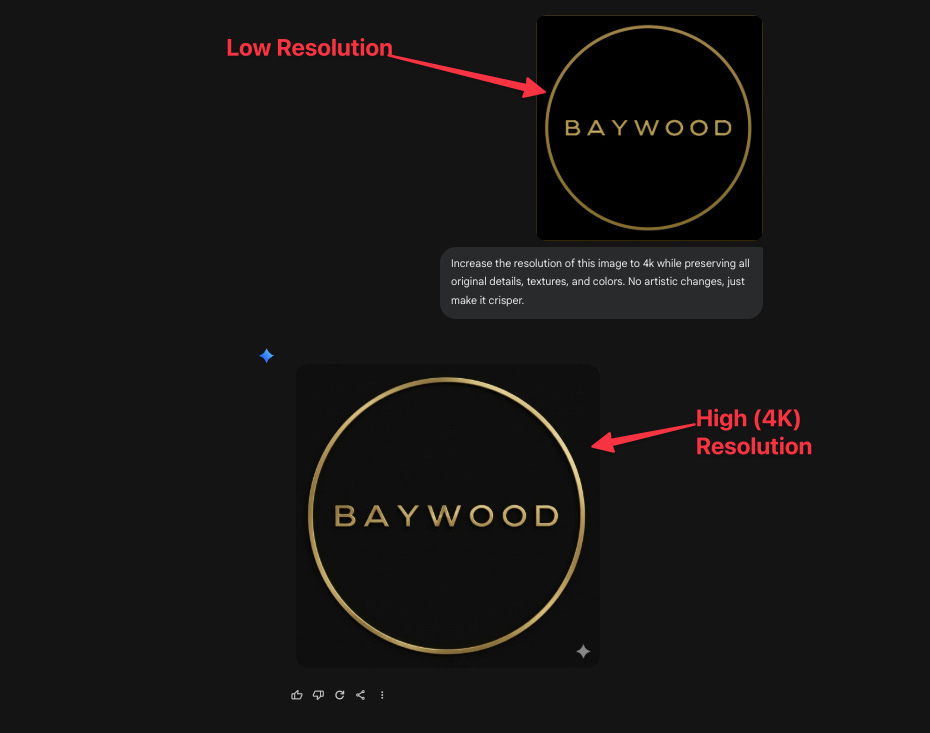
This used to cost real money through dedicated upscaling tools. Now it’s free.
3. Swap one thing. Keep everything else.
You have a product shot. But the client wants to see a different object on the table. Or the sign on the wall needs to change. Or you like everything about the image style, but you only want to replace the product.
Copy this prompt (update the text inside [ ] as per your requirement)
In this image, find the [object] located at [area of the image] and replace it with [new object]. Everything else in the scene must remain identical.“In this image, find the typewriter located at left-hand side of the image and replace it with a flower vase with flowers in it. Everything else in the scene must remain identical”
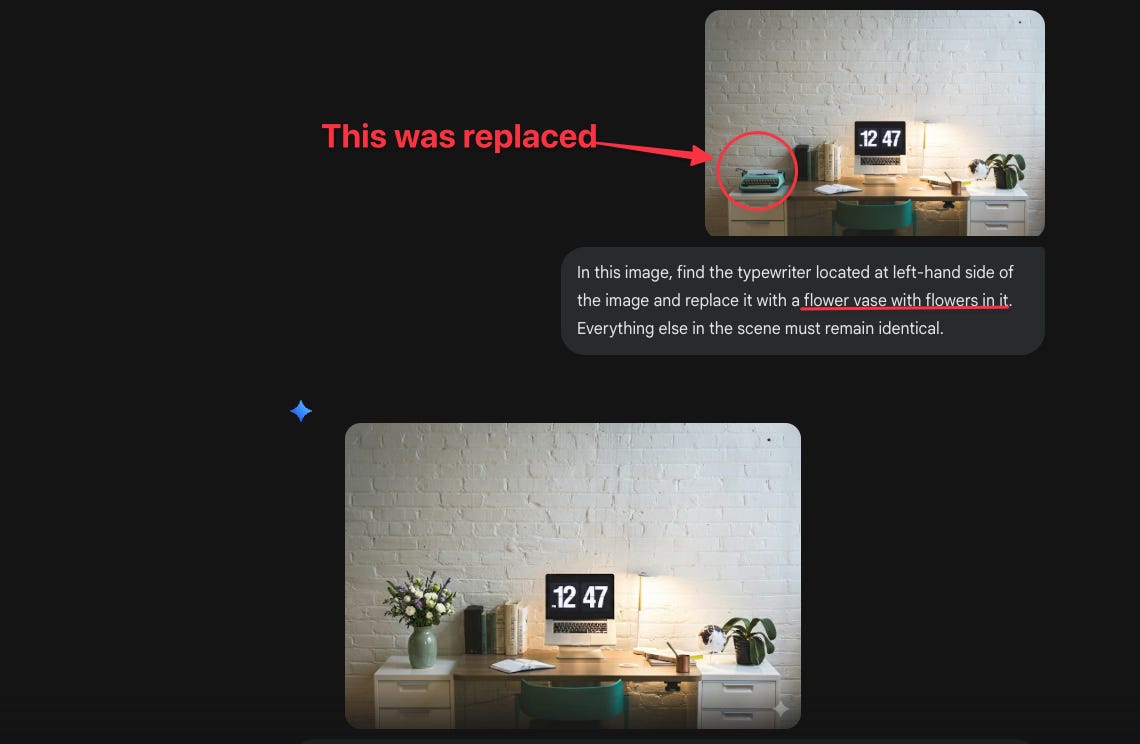
Surgical. Precise. The rest of the image stays untouched.
4. Color changes in seconds.
Same image. Different color. No masking. No selection tools. No layers.
Copy this prompt (update the text inside [ ] as per your requirement)
Recolor only the [object] in this image to [new color + finish]. Do not alter any other part of the image — lighting, shadows, and reflections should adjust naturally to the new color.“Recolor only the dress worn by the woman in this image to burnt orange. Do not alter any other part of the image — lighting, shadows, and reflections should adjust naturally to the new color.”
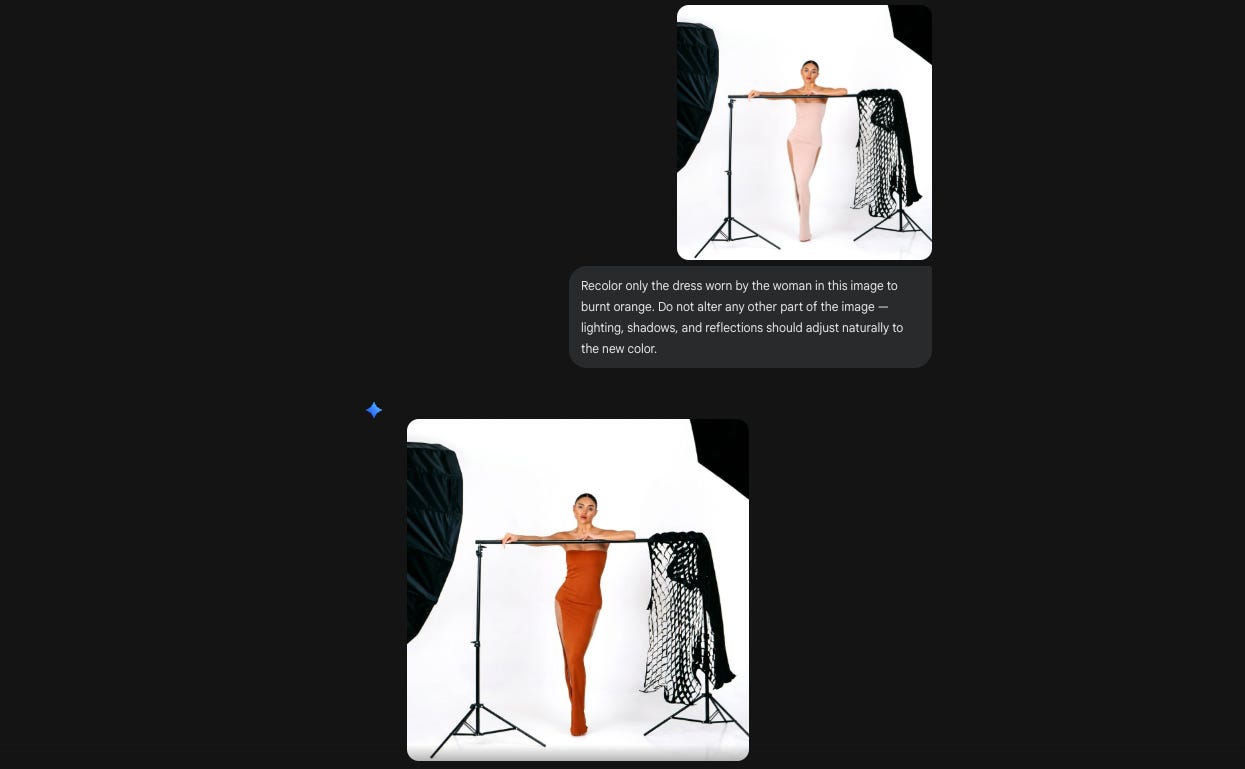
I ran this on a product shoot with 6 color variants.
What would’ve been 6 separate Photoshop edits took about 4 minutes total.
Great for product variations, A/B testing ad creatives, or just exploring options before committing.
5. Outfit and fashion visualization.
Try different outfits on a photo. Fashion brands. E-commerce stores. Personal styling services.
Copy this prompt (update the text inside [ ] as per your requirement)
Replace the clothing on the person in this photo with [detailed outfit description]. Preserve their face, hair, pose, body proportions, and the background exactly as they are. The new clothing should have realistic fabric texture and fit naturally on their body.“Replace the clothing on the person in this photo with a black closed-neck jacket with gold buttons over a white mandarin-collar shirt. Preserve their face, hair, pose, body proportions, and the background exactly as they are. The new clothing should have realistic fabric texture and fit naturally on their body.”
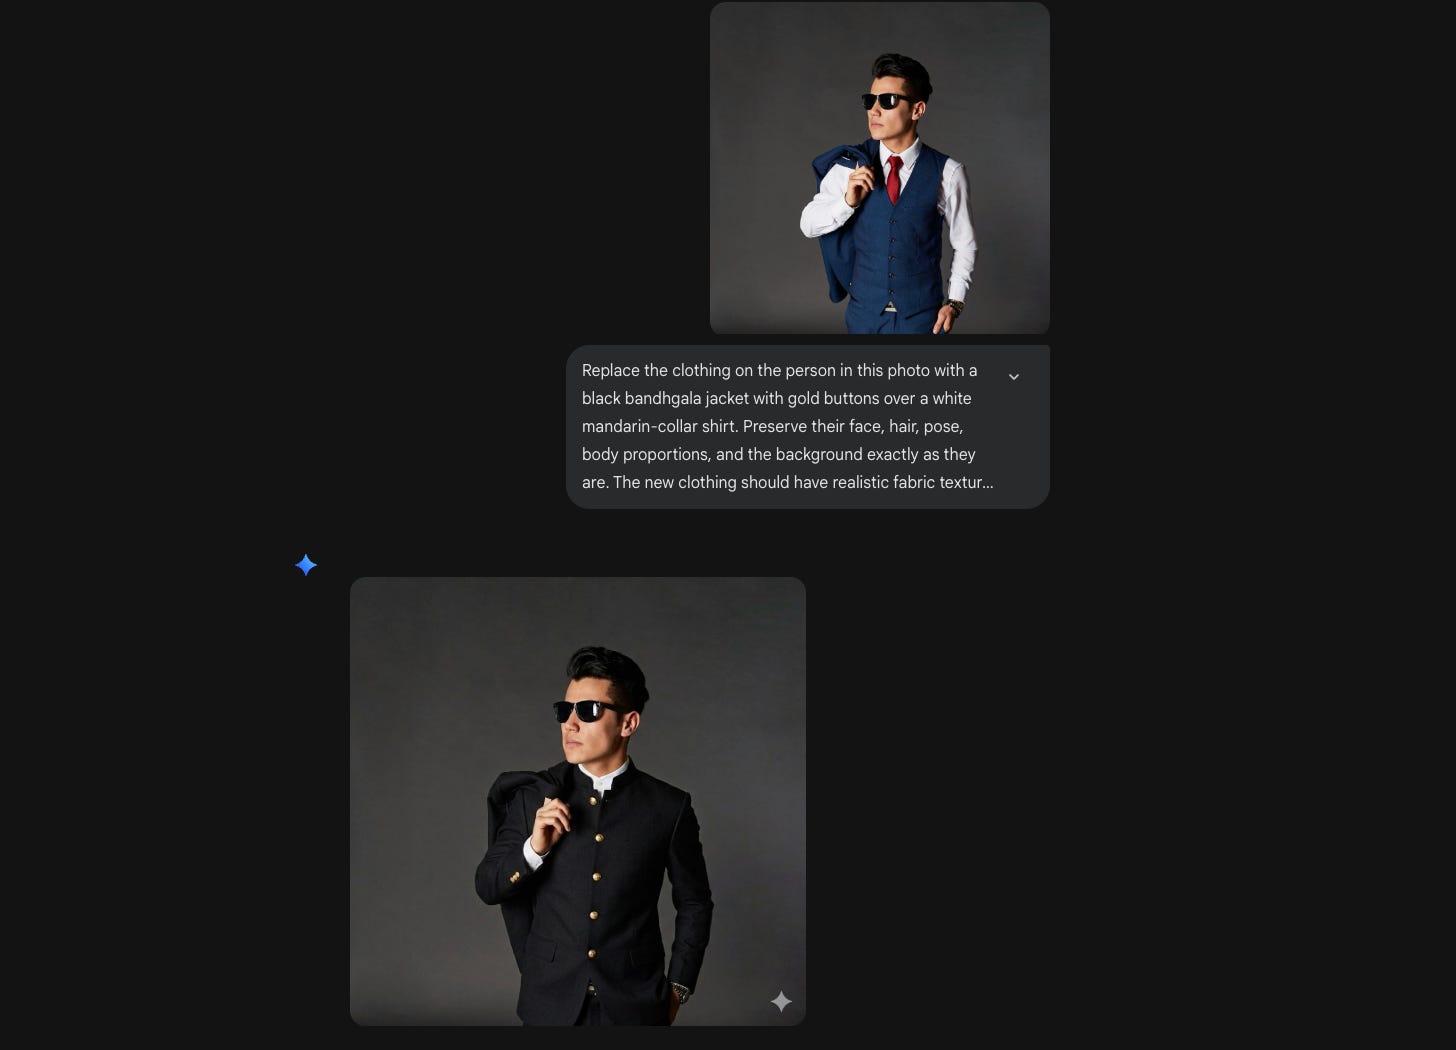
Upload your photo. Describe the outfit. Done.
6. Background swaps.
Keep the subject. Change the world behind them.
Copy this prompt (update the text inside [ ] as per your requirement)
Remove the current background and place the subject into [new environment]. Match the lighting and color temperature of the new environment to the subject so it looks like one natural photograph.“Remove the current background and place the subject into a beach environment. Match the lighting and color temperature of the new environment to the subject so it looks like one natural photograph.”
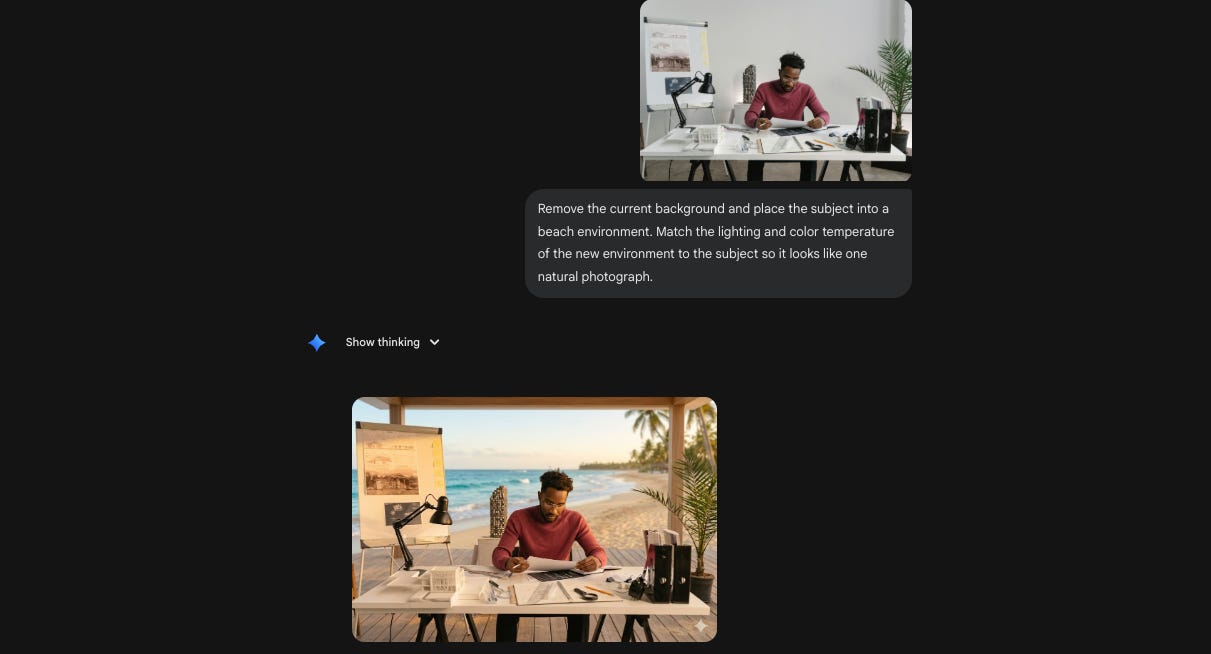
No green screen. No manual masking. Upload and describe.
7. Real estate agents need staged rooms.
Empty apartment. No furniture. The listing looks cold and uninviting.
Upload the photo. Then:
Copy this prompt (update the text inside [ ] as per your requirement)
Digitally stage this empty room with [design style] furniture and décor. Include [specific items]. The original architecture — walls, floor, ceiling, windows, and doors — must stay completely unchanged. Make it look like a real interior photograph, not a render.“Digitally stage this empty room with modern industrial furniture and décor. Include a brown leather sofa, a matte black metal coffee table, a jute rug, and warm Edison bulb floor lamp. The original architecture — walls, floor, ceiling, windows, and doors — must stay completely unchanged. Make it look like a real interior photograph, not a render.”
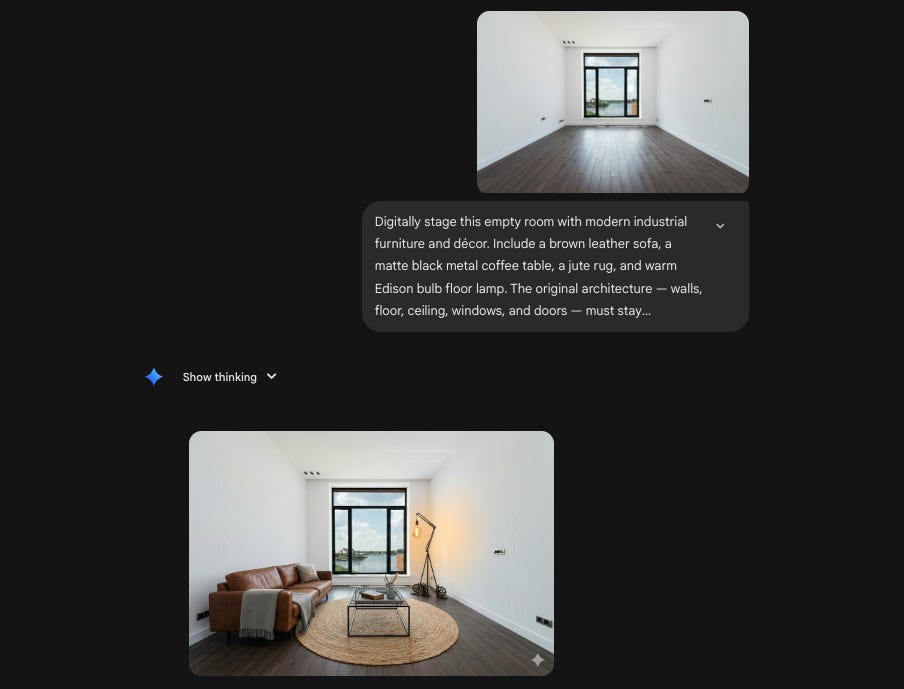
Virtual staging used to be a dedicated service. ₹3,000–₹8,000 per room. Now it’s a prompt.
Part 2: Generate New Images
Now let’s talk about creating from scratch.
You’ve fixed what you had. But some images don’t exist yet.
The product photo. The food shot. The mockup deck.
Hiring a photographer, renting a studio, booking a stylist; that’s $2000 before anyone presses a shutter button.
Or you could type a prompt.
Here’s where Nano Banana 2 starts paying for itself.
8. Restaurant menus need food photos. Always.
Every restaurant client has the same problem: they need beautiful food photography and they don’t want to pay $1000 to $2000 for a shoot.
Copy this prompt (update the text inside [ ] as per your requirement)
Photorealistic food photograph: [dish name and description] served in [plate/bowl type] on [table/surface]. Styling includes [garnishes and props]. Camera angle: [top-down / 45-degree / eye-level]. Lighting: [lighting mood]. The image should look like it belongs in a premium food magazine.“Photorealistic food photograph: butter chicken with a swirl of cream served in a black ceramic bowl on a dark walnut table. Styling includes torn naan on the side, fresh cilantro leaves, and a copper spoon. Camera angle: 45-degree. Lighting: warm, single-source from the left. The image should look like it belongs in a premium food magazine.”
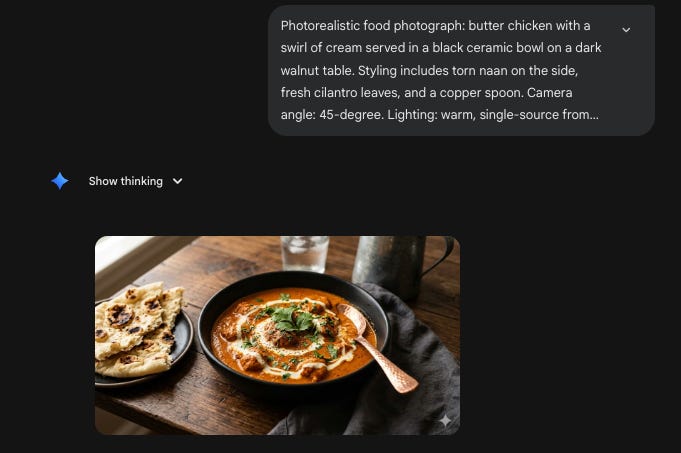
Is it as good as a real food photographer? No.
Is it good enough for a social media post, a Google Business listing, or a quick menu mockup? Absolutely.
9. Product mockups without a photoshoot.
You’re building a landing page. The product exists but professional photography doesn’t. Or the product doesn’t exist yet and you need visuals for a pitch deck.
Copy this prompt (update the text inside [ ] as per your requirement)
Product photography: [product description] placed on [surface], inside [setting/environment]. Photography style: [editorial / e-commerce / lifestyle]. Lighting: [description]. Aspect ratio: [X:Y]. The product must be the clear focal point.“Product photography: a frosted glass skincare bottle with a bamboo cap placed on a marble bathroom shelf, next to a sprig of eucalyptus. Photography style: editorial beauty. Lighting: soft diffused morning light from a window on the right. Aspect ratio: 4:5. The product must be the clear focal point.”
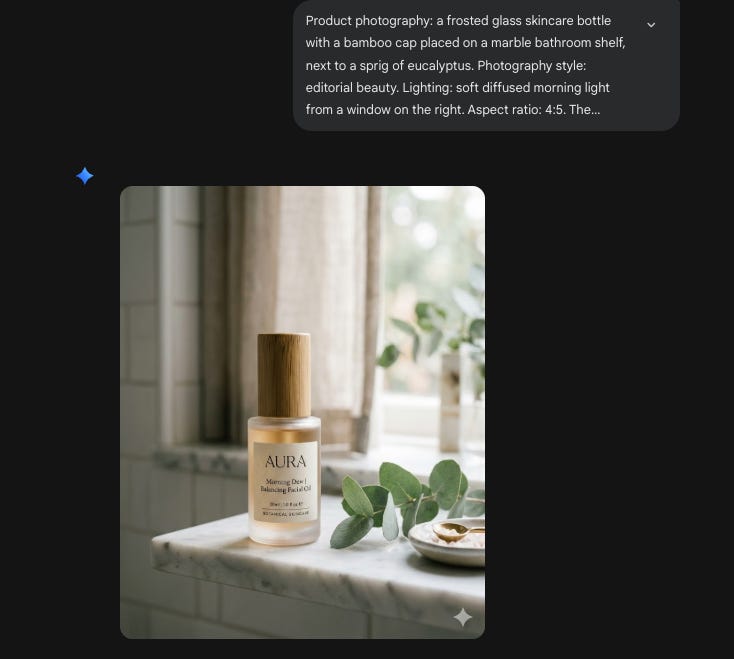
You can build an entire product page for your website or funnel before the product photos arrive.
10. Logo on everything. Instantly.
Client just approved their logo. Now they want to see it. On a mug. On a storefront. On a business card. On packaging. On a t-shirt.
Copy this prompt (update the text inside [ ] as per your requirement)
Apply the uploaded logo onto a [object/surface] in a realistic setting. The logo should conform naturally to the surface — following curves, texture, and perspective. Environment: [setting]. Lighting: [description]. The result should look like an actual product photograph.“Apply the uploaded logo onto a frosted glass office door in a realistic setting. The logo should conform naturally to the surface — following curves, texture, and perspective. Environment: modern corporate hallway with soft overhead lighting. The result should look like an actual product photograph.”
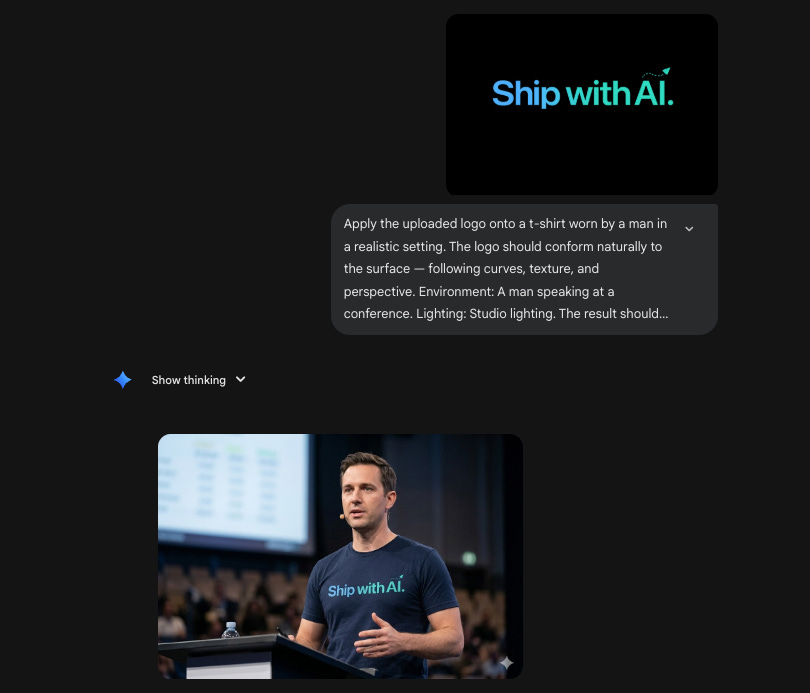
Upload the logo alongside the prompt. Run it five times with five different surfaces. Send the client a mockup deck in 20 minutes.
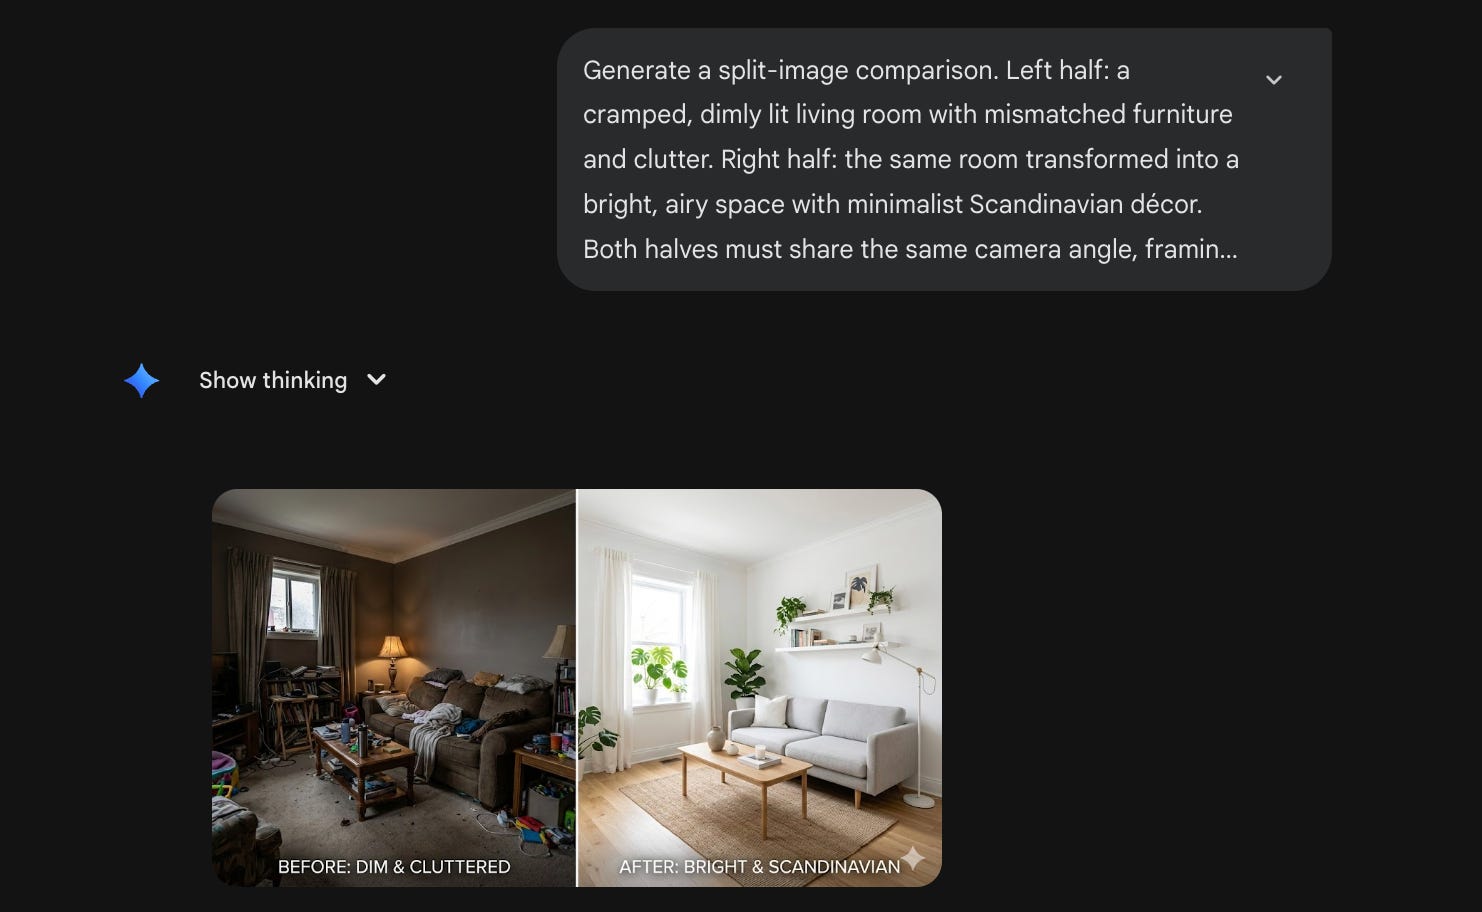
11. Before-and-after transformations.
Show a side-by-side transformation. Perfect for renovation portfolios, fitness content, product redesigns, case studies, or marketing campaigns.
Copy this prompt (update the text inside [ ] as per your requirement)
Generate a split-image comparison. Left half: [before description]. Right half: [after description]. Both halves must share the same camera angle, framing, and proportions so the transformation is immediately obvious. Add a thin vertical divider line between the two halves.“Generate a split-image comparison. Left half: a cramped, dimly lit living room with mismatched furniture and clutter. Right half: the same room transformed into a bright, airy space with minimalist Scandinavian décor. Both halves must share the same camera angle, framing, and proportions so the transformation is immediately obvious. Add a thin vertical divider line between the two halves.”
Part 3: Social media at scale.
Now let’s talk about the volume problem.
Every client needs 20–30 social posts per month. Every month. Forever. Instagram. LinkedIn. Facebook. Stories. Reels covers. Carousels. Youtube thumbnails.
You know the math. One custom graphic takes 20–30 minutes in Canva if you’re fast. Multiply that by 25 posts. That’s 10+ hours per client per month, just on static visuals.
And you’re not handling one client. You’re handling four. Maybe six.
That’s 60–150 graphics a month. By hand. Every month. It doesn’t scale. It never scaled.
Nano Banana 2 changes the equation. Not because the quality is better than a designer’s eye. But because the first draft, the visual starting point, now takes 30 seconds instead of 30 minutes.
That’s not a small improvement. That’s a different business model.
12. Quote cards with readable text.
Every brand posts quotes. Tips. Stats. One-liners.
And every time, it’s the same workflow: open Canva, pick a template, change the colors, adjust the font size, nudge the alignment, export.
For one card? Fine.
For 15 cards across 3 clients? That’s an hour of mechanical work that adds zero creative value.
Now describe the card. Describe the text. Describe the vibe. One prompt. Done.
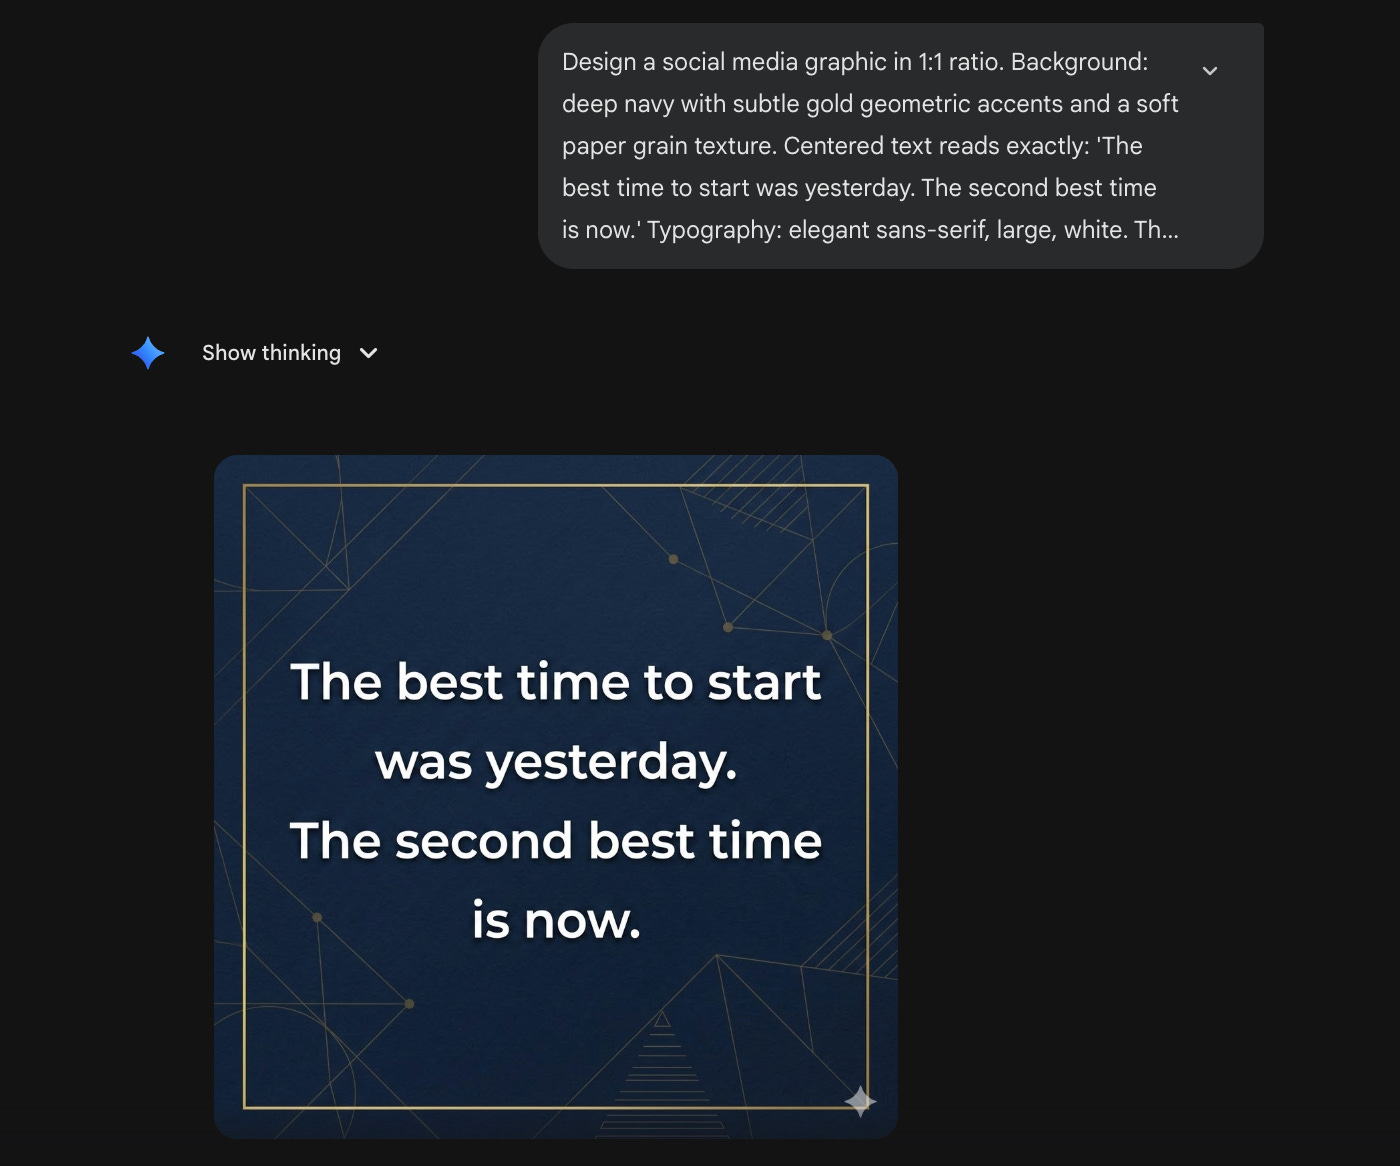
The text actually renders clean, legible, properly spelled, correctly placed. Which means quote cards, tip carousels, stat highlights, and branded one-liners are now a 5-minutes job or less.
Copy this prompt (update the text inside [ ] as per your requirement)
Design a social media graphic in [X:Y] ratio. Background: [color palette and visual elements]. Centered text reads exactly: “[Your quote here]”. Typography: [font style, size feel, color]. The text must be crisp, legible, and properly spelled. Add [any additional design elements].“Design a social media graphic in 1:1 ratio. Background: deep navy with subtle gold geometric accents and a soft paper grain texture. Centered text reads exactly: ‘The best time to start was yesterday. The second best time is now.’ Typography: elegant sans-serif, large, white. The text must be crisp, legible, and properly spelled. Add a thin gold border.”
No Canva. No templates. Just describe what you want.
13. YouTube thumbnails that actually get clicks.
Thumbnails are the single highest-leverage visual asset on the internet. One image decides whether someone watches a 10-minute video or keeps scrolling.
And yet most creators are spending 30–45 minutes per thumbnail in Photoshop or Canva. Cutting out backgrounds. Adding text. Tweaking expressions. Finding the right stock image for the background.
For creators posting 2–3 videos a week, that’s 2+ hours on thumbnails alone. Every week.
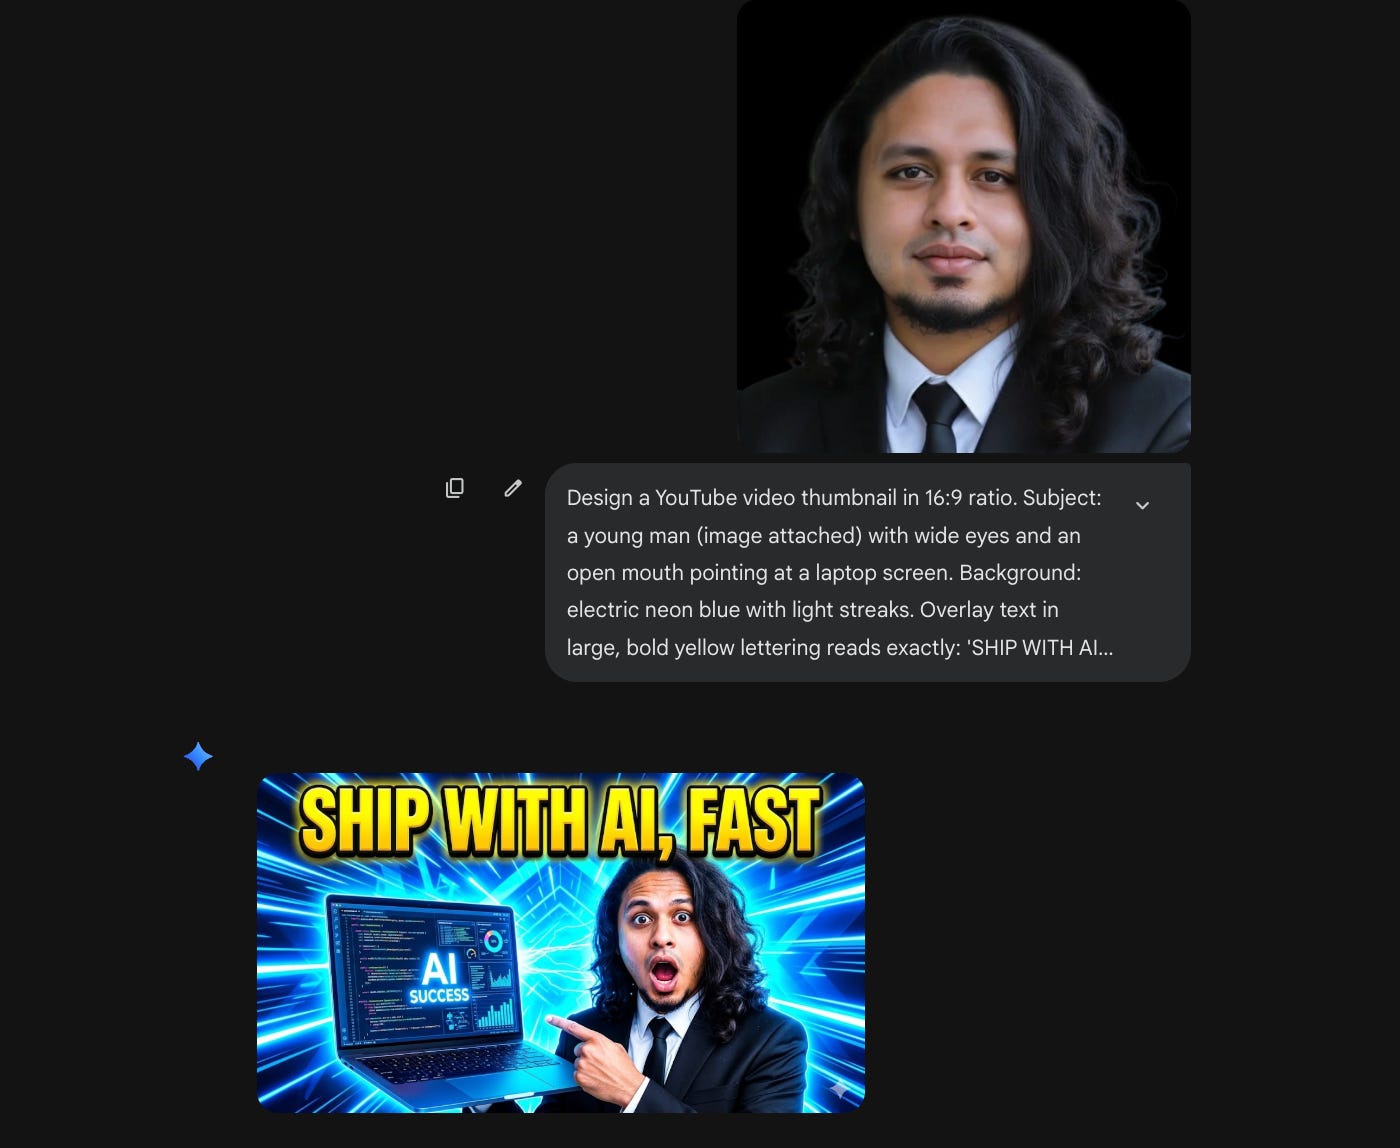
Now describe the face, the expression, the background color, the text overlay and get a click-worthy thumbnail in one shot.
Test 3 variations in 5 minutes instead of agonizing over one for an hour.
Copy this prompt (update the text inside [ ] as per your requirement)
Design a YouTube video thumbnail in 16:9 ratio. Subject: [person or character description] with [expression and pose]. Background: [color/scene, high contrast]. Overlay text in large, bold [color] lettering reads exactly: “[TITLE]”. The overall image should be visually loud, high-energy, and impossible to scroll past.“Design a YouTube video thumbnail in 16:9 ratio. Subject: a young man with wide eyes and an open mouth pointing at a laptop screen. Background: electric neon blue with light streaks. Overlay text in large, bold yellow lettering reads exactly: ‘GOOGLE JUST BROKE THE INTERNET’. The overall image should be visually loud, high-energy, and impossible to scroll past.”
No Canva needed.
Pro tip: If you want the face of a specific person, add that as a reference image.
14. Event posters with all the details baked in.
Every local business runs events. Workshop announcements. Grand openings. Festival sales. Live music nights. Comedy shows. Weekend markets.
And every time, someone needs a poster. Fast. With the event name, the date, the venue, and a vibe that matches, all in one image.
The old way: open Canva, find a template that’s close enough, swap the text, fight with the layout, realize the stock background doesn’t match the mood, settle for something “okay.”
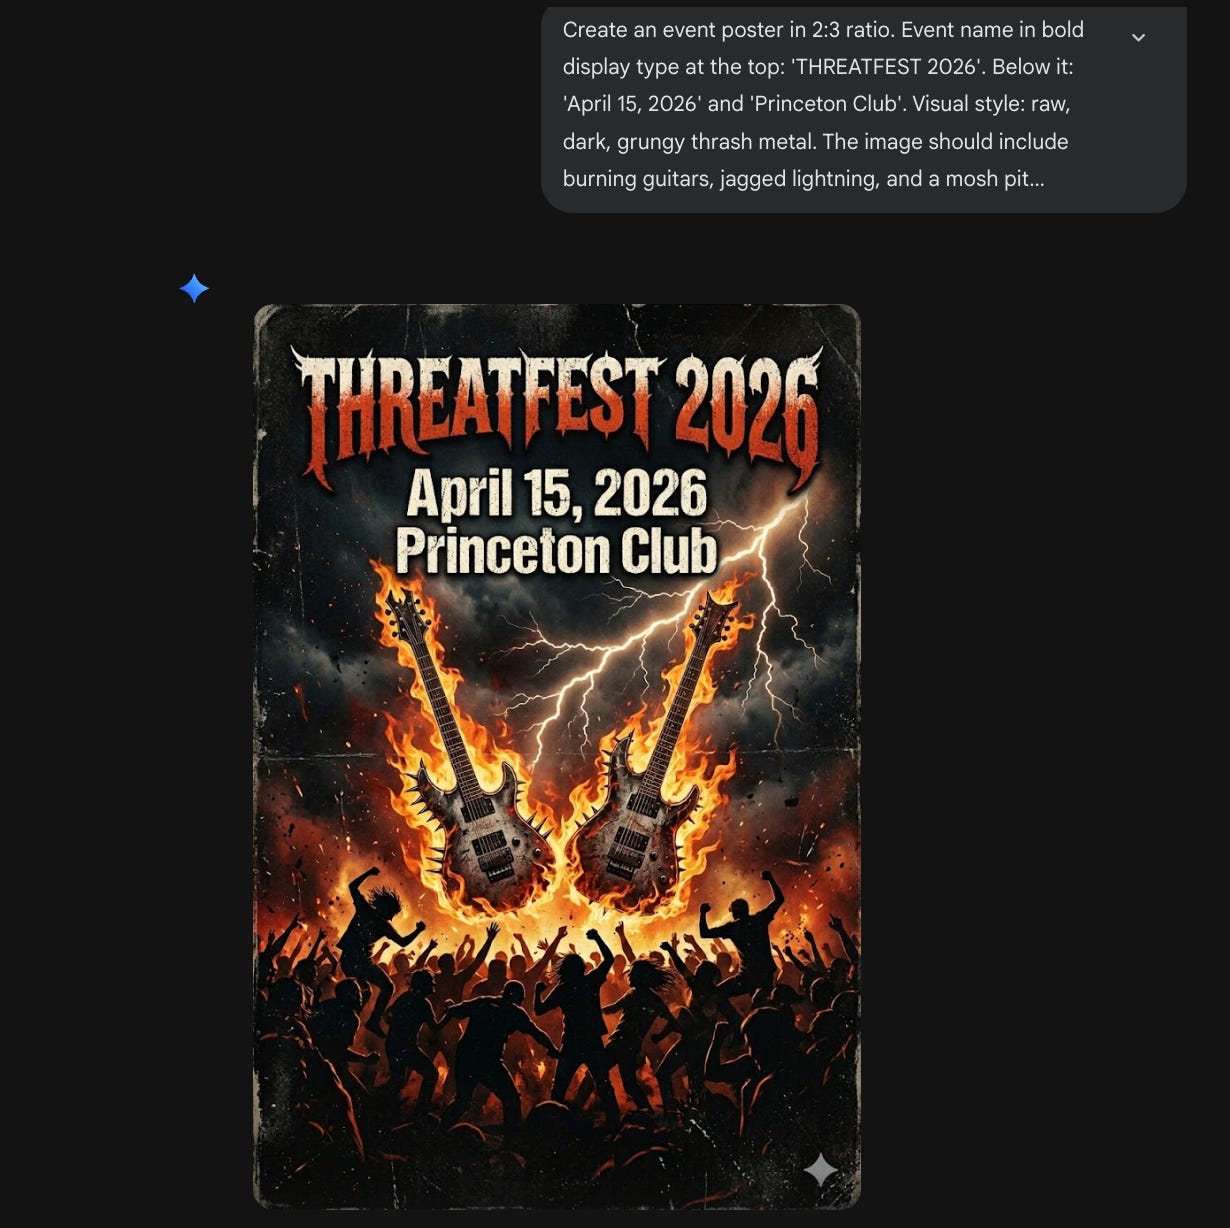
Now describe the event, the aesthetic, and every piece of text you need on it. One prompt. The headline, date, venue, and visual style come out together as one cohesive image, not a template with text slapped on top.
Copy this prompt (update the text inside [ ] as per your requirement)
Create an event poster in [X:Y] ratio. Event name in bold display type at the top: “[TITLE]”. Below it: “[date]” and “[venue]”. Visual style: [aesthetic description]. The image should include [specific visual elements]. All text must be fully readable and correctly spelled.“Create an event poster in 2:3 ratio. Event name in bold display type at the top: ‘THREATFEST 2026’. Below it: ‘April 15, 2026’ and ‘Princeton Club’. Visual style: raw, dark, grungy thrash metal. The image should include burning guitars, jagged lightning, and a mosh pit silhouette in the lower half. All text must be fully readable and correctly spelled.”
15. Article to Infographic. One prompt.
You spent 3 hours writing a blog post. It’s good. Detailed. Valuable.
It gets 200 views.
Then you see someone else take their article, turn it into a visual infographic, post it on LinkedIn and it gets 15,000 impressions.
Same information. Different format. Wildly different reach.
The problem was never the content. It was the packaging. Long-form text doesn’t stop the scroll. A well-structured visual does.
But turning a 1,500-word article into an infographic used to mean hiring a designer. Or spending an hour in Canva dragging boxes around, trying to make your bullet points look “visual.”
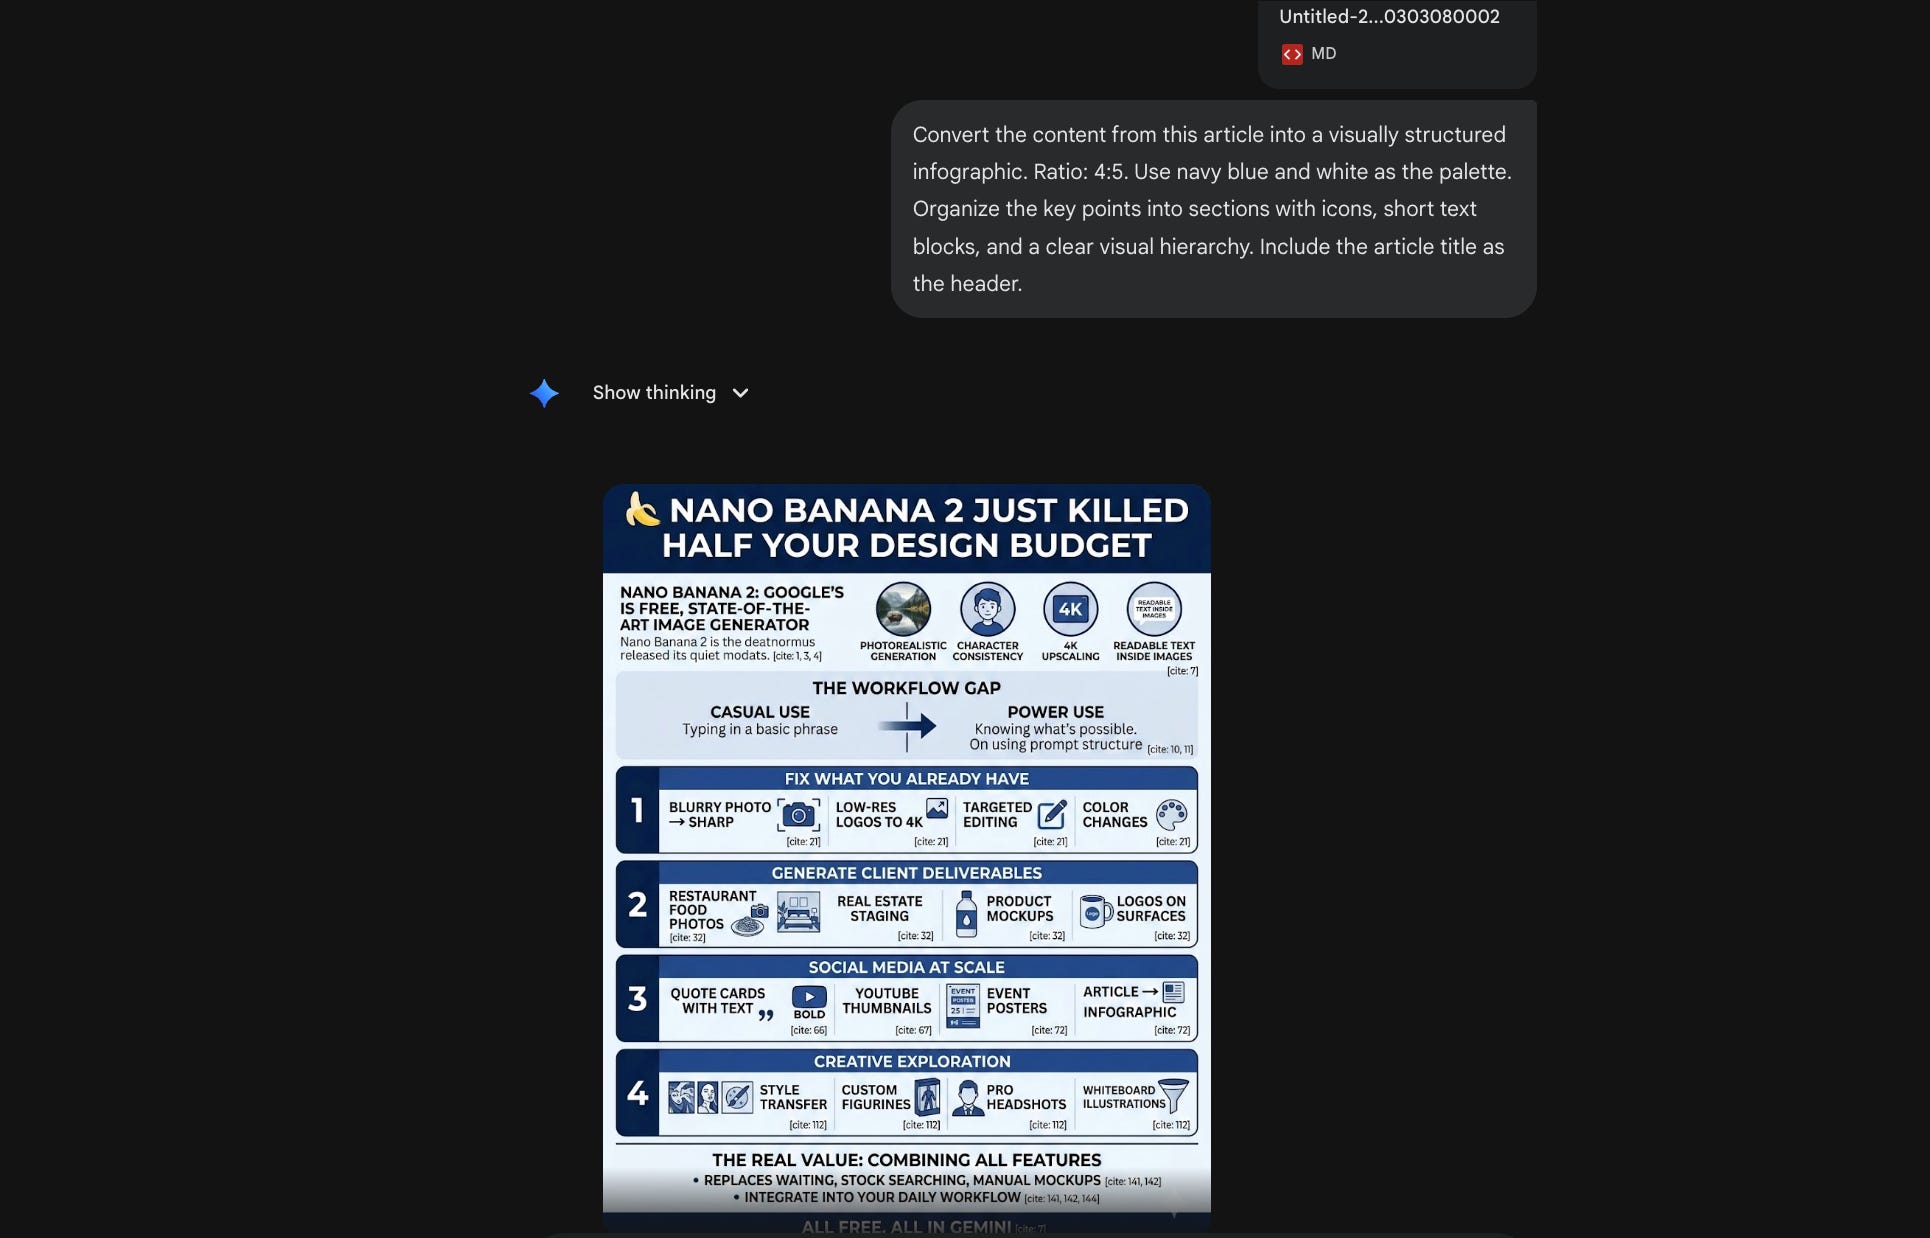
Now paste the article link or upload the article content. Pick your dimension for the image. Give one prompt. You get a structured visual with your key points organized, color-coded, and laid out.
Copy this prompt (update the text inside [ ] as per your requirement)
Convert the content from this article into a visually structured infographic. Ratio: [X:Y]. Use [color scheme] as the palette. Organize the key points into sections with icons, short text blocks, and a clear visual hierarchy. Include the article title as the header. Link/upload: [paste URL or upload file].“Convert the content from this article into a visually structured infographic. Ratio: 4:5. Use navy blue and white as the palette. Organize the key points into sections with icons, short text blocks, and a clear visual hierarchy. Include the article title as the header.”
Use 4:5 for Instagram/LinkedIn. 16:9 for X. 9:16 for Stories and Reels.
Will it replace a custom-designed infographic from a professional designer? No.
Will it get you 80% of the way there in 30 seconds instead of 60 minutes? That’s the point.
16. Seasonal content on demand.
Black Friday. Thanksgiving. Christmas. New Years. Every holiday / festival needs themed content and every client asks for it two days before the holiday / festival.
Copy this prompt (update the text inside [ ] as per your requirement)
Generate a [holiday/festival] themed photorealistic image featuring [subject — storefront, product, or scene]. Decorate the scene with [festival-specific elements]. The mood should feel [warm/celebratory/festive/joyful]. Lighting: [description]. The image should evoke the spirit of the celebration without looking artificial.“Generate a Diwali-themed photorealistic image featuring a café storefront at dusk. Decorate the scene with rows of clay diyas along the entrance, marigold garlands draped across the awning, and warm string lights overhead. The mood should feel warm and inviting. Lighting: golden hour with soft glowing highlights from the diyas. The image should evoke the spirit of the celebration without looking artificial.”
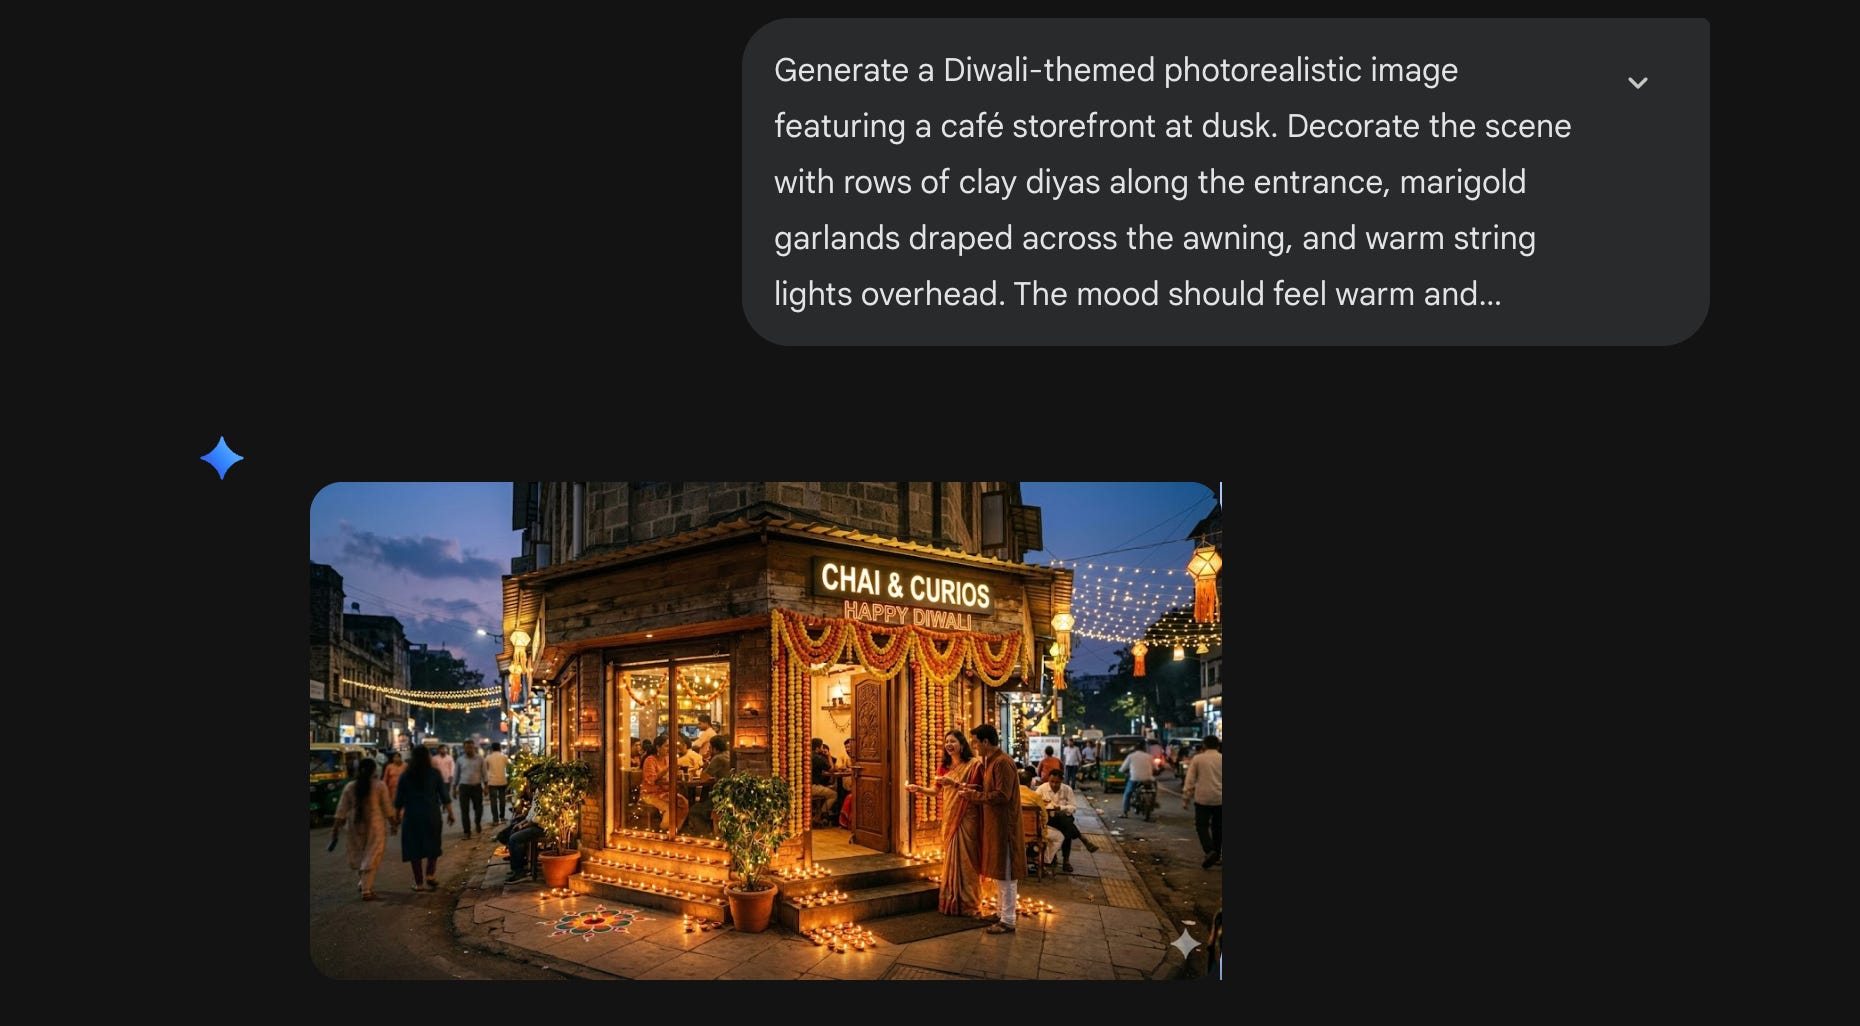
Batch out 10 of these in an afternoon. Schedule them. Move on.
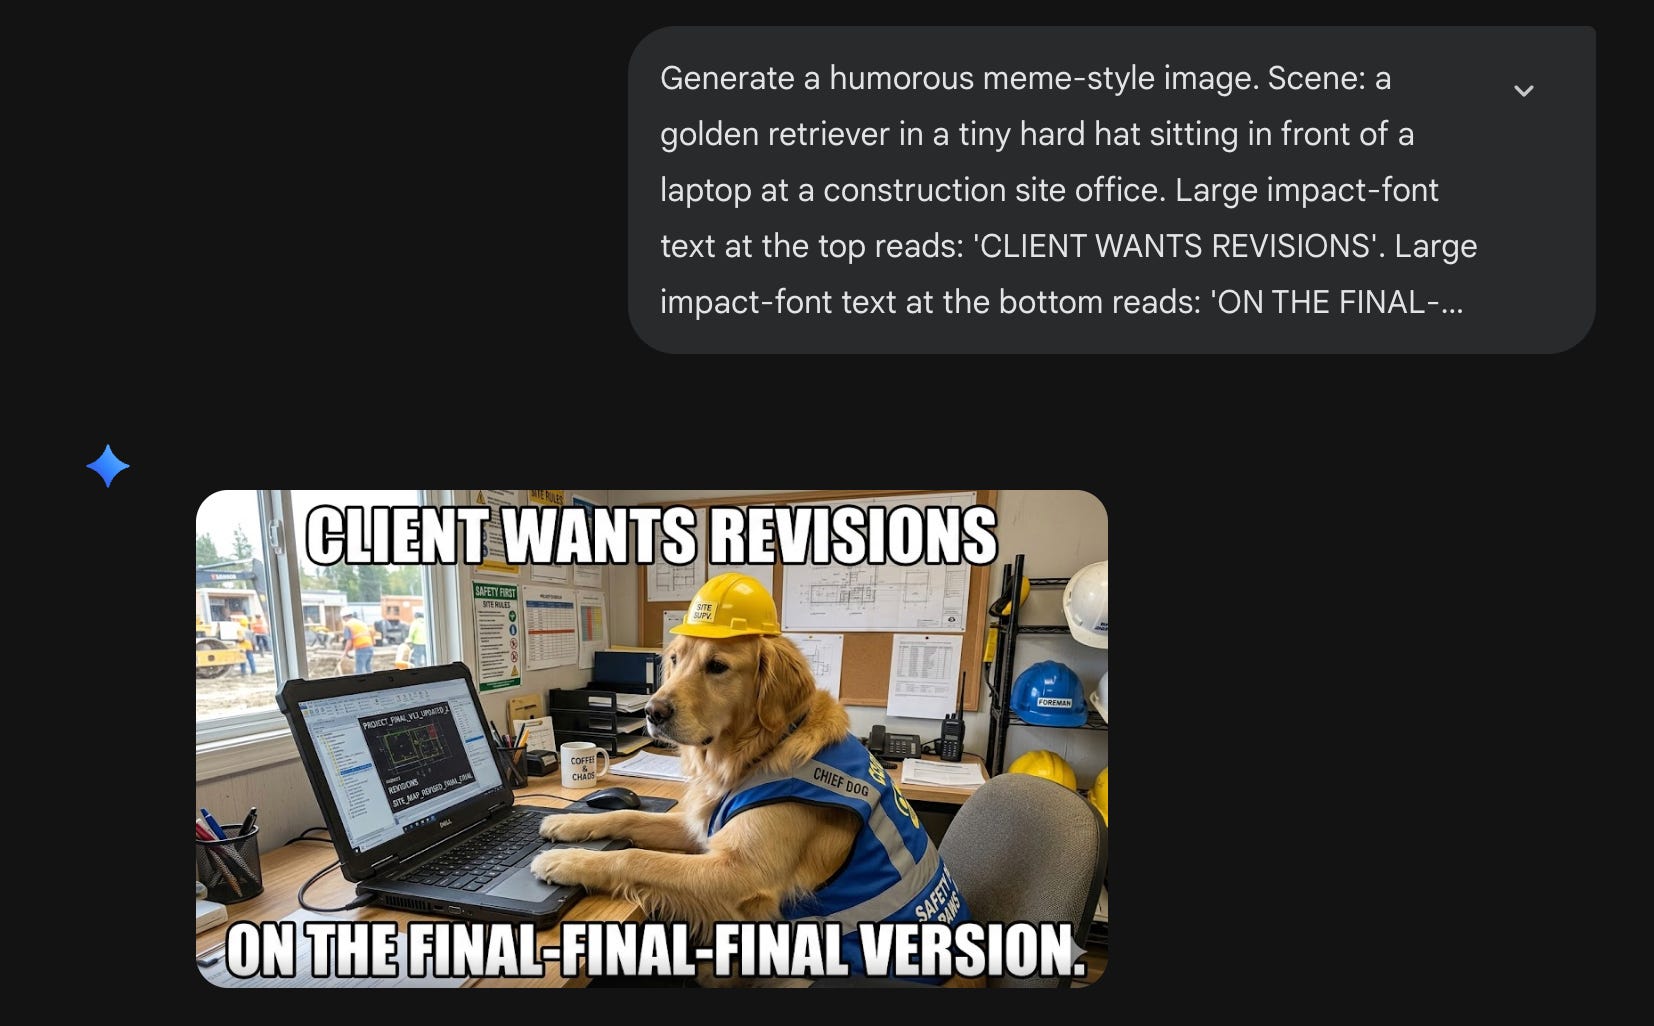
17. Memes. Because sometimes you need memes.
Don’t overthink this. Memes convert.
Copy this prompt (update the text inside [ ] as per your requirement)
Generate a humorous meme-style image. Scene: [describe the absurd or funny visual]. Large impact-font text at the top of the image reads: “[TOP LINE]”. Large impact-font text at the bottom reads: “[BOTTOM LINE]”. The overall tone is [funny / sarcastic / deadpan / absurd].
“Generate a humorous meme-style image. Scene: a golden retriever in a tiny hard hat sitting in front of a laptop at a construction site office. Large impact-font text at the top reads: ‘CLIENT WANTS REVISIONS’. Large impact-font text at the bottom reads: ‘ON THE FINAL-FINAL-FINAL VERSION.’ The overall tone is deadpan corporate humor.”
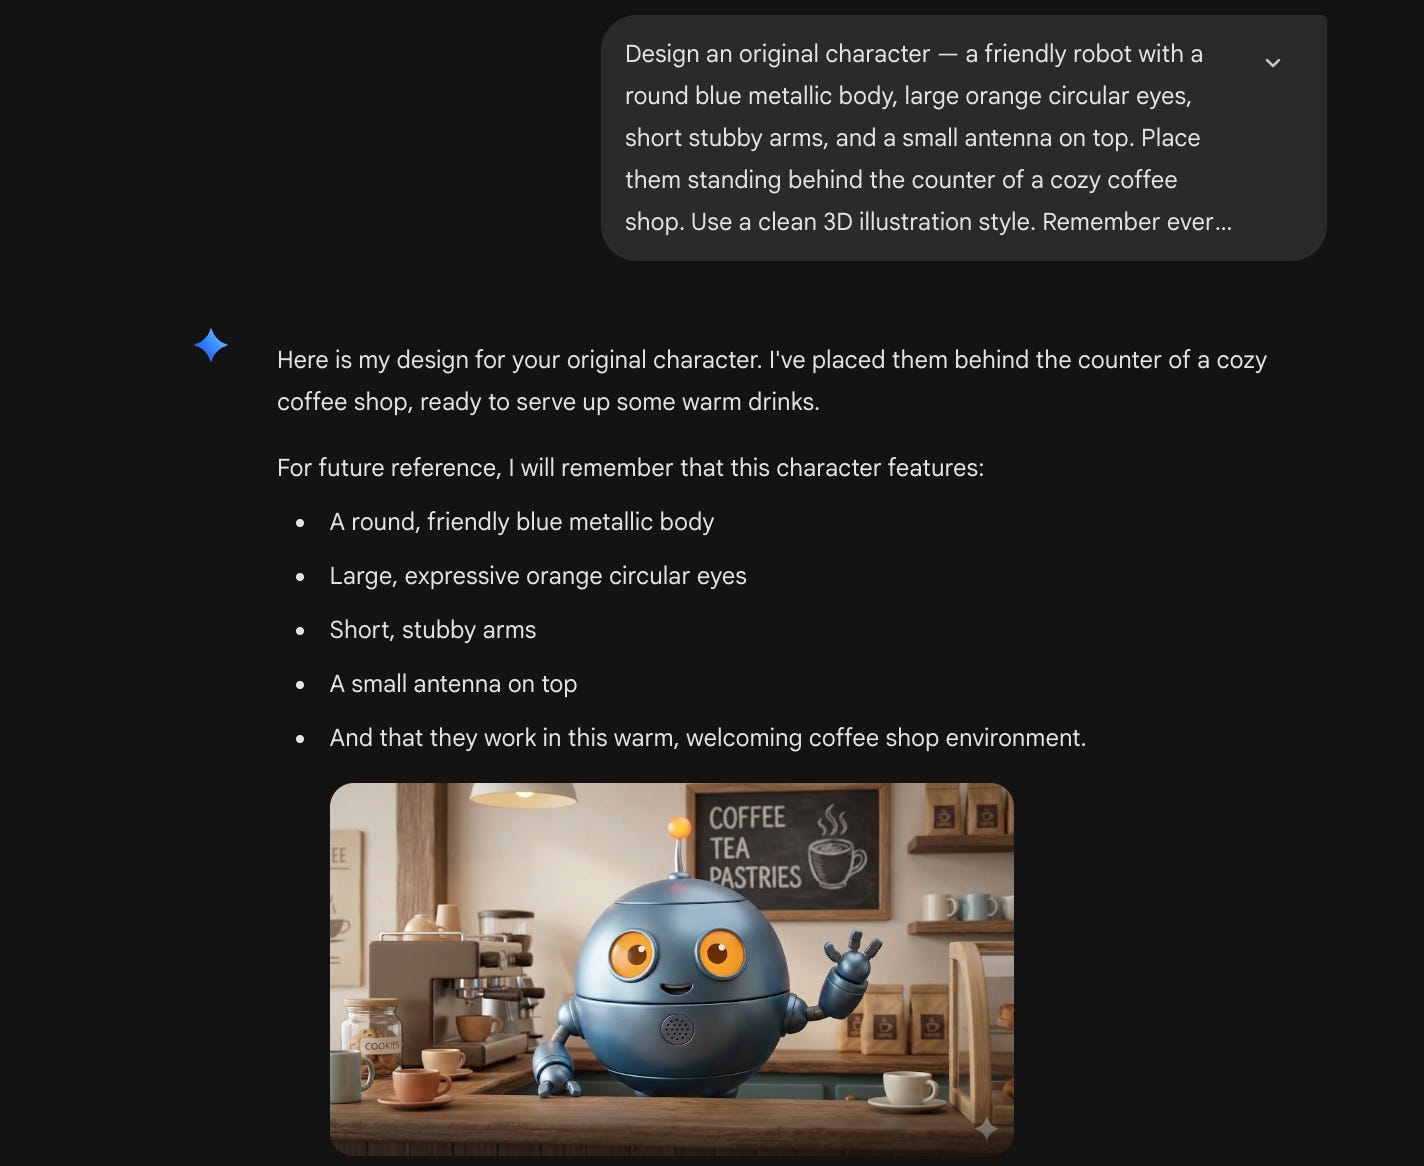
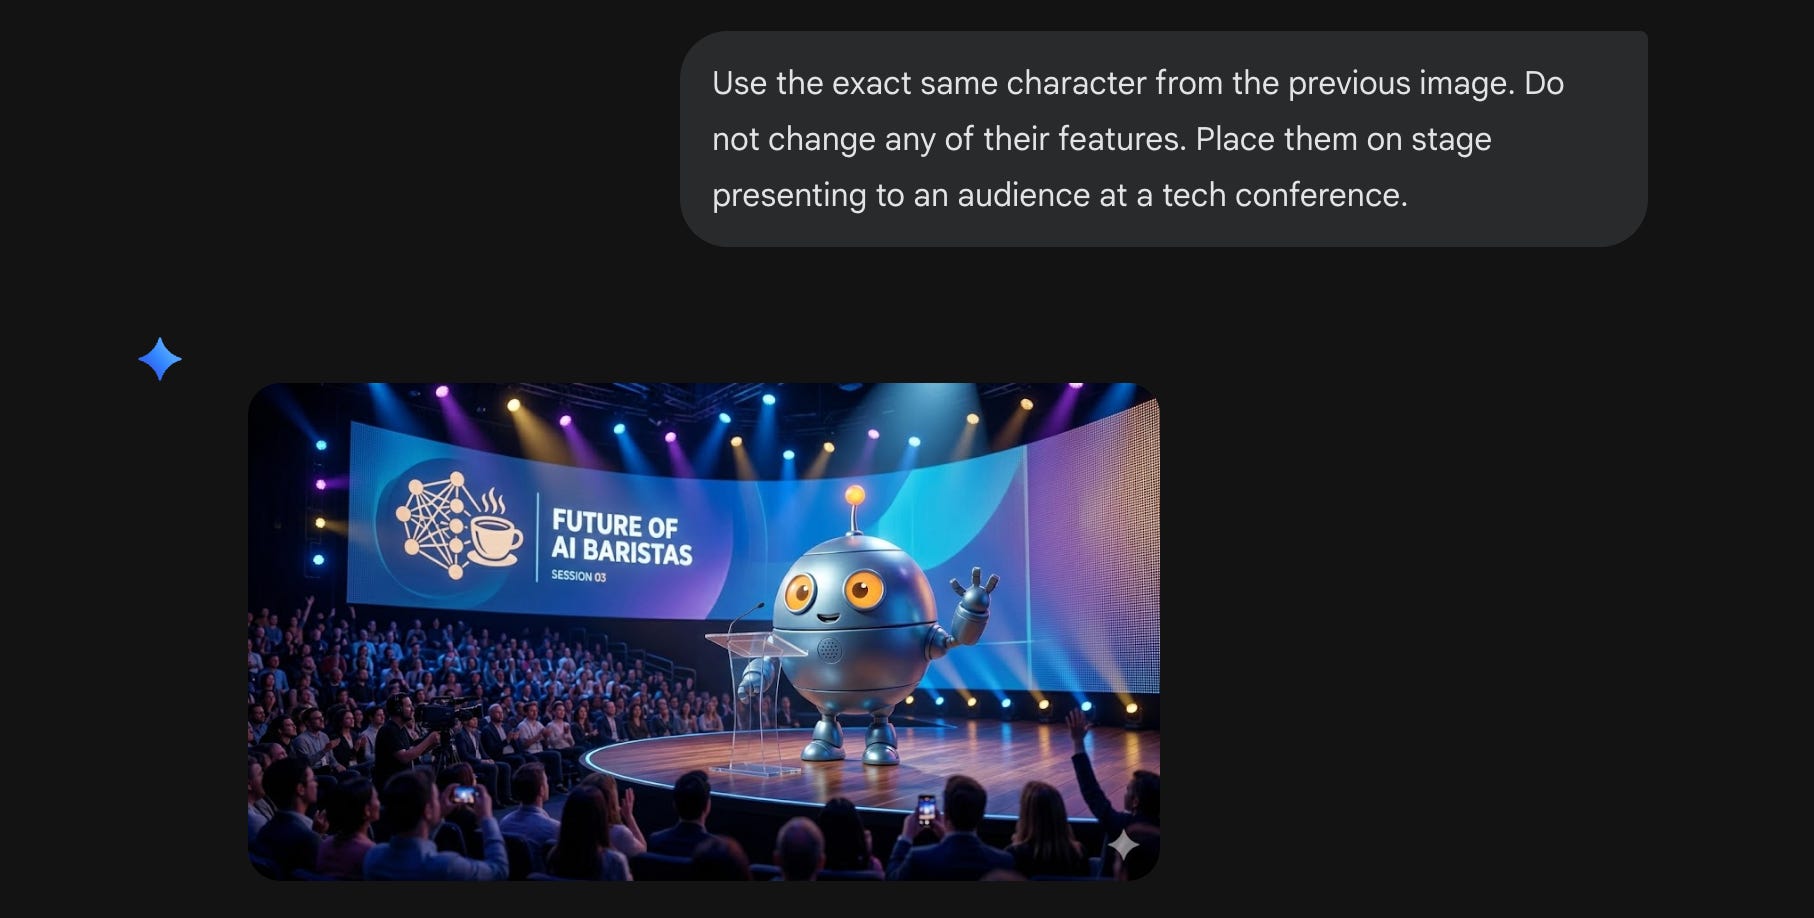
18. Character consistency across a series.
This is the underrated feature nobody’s talking about enough.
You can create a character and then put them in multiple scenes and they’ll look like the same character. Essential for brand mascots, children’s content, ad campaign series, or storytelling posts.
Copy these prompts and use them in sequence (update the text inside [ ] as per your requirement)
Prompt 1: Design an original character — [detailed character description: body shape, colors, features, clothing]. Place them in [scene 1]. Use a [art style] style. Remember every detail of this character for follow-up images.

Prompt 2: Use the exact same character from the previous image. Do not change any of their features. Place them in [scene 2].

Prompt 3: Same character again, same features. Now place them in [scene 3].
“Design an original character — a friendly robot with a round blue metallic body, large orange circular eyes, short stubby arms, and a small antenna on top. Place them standing behind the counter of a cozy coffee shop. Use a clean 3D illustration style. Remember every detail of this character for follow-up images.”
→ “Use the exact same character from the previous image. Do not change any of their features. Place them on stage presenting to an audience at a tech conference.”
→ “Same character again, same features. Now place them sitting on a park bench reading a book on a sunny afternoon.”
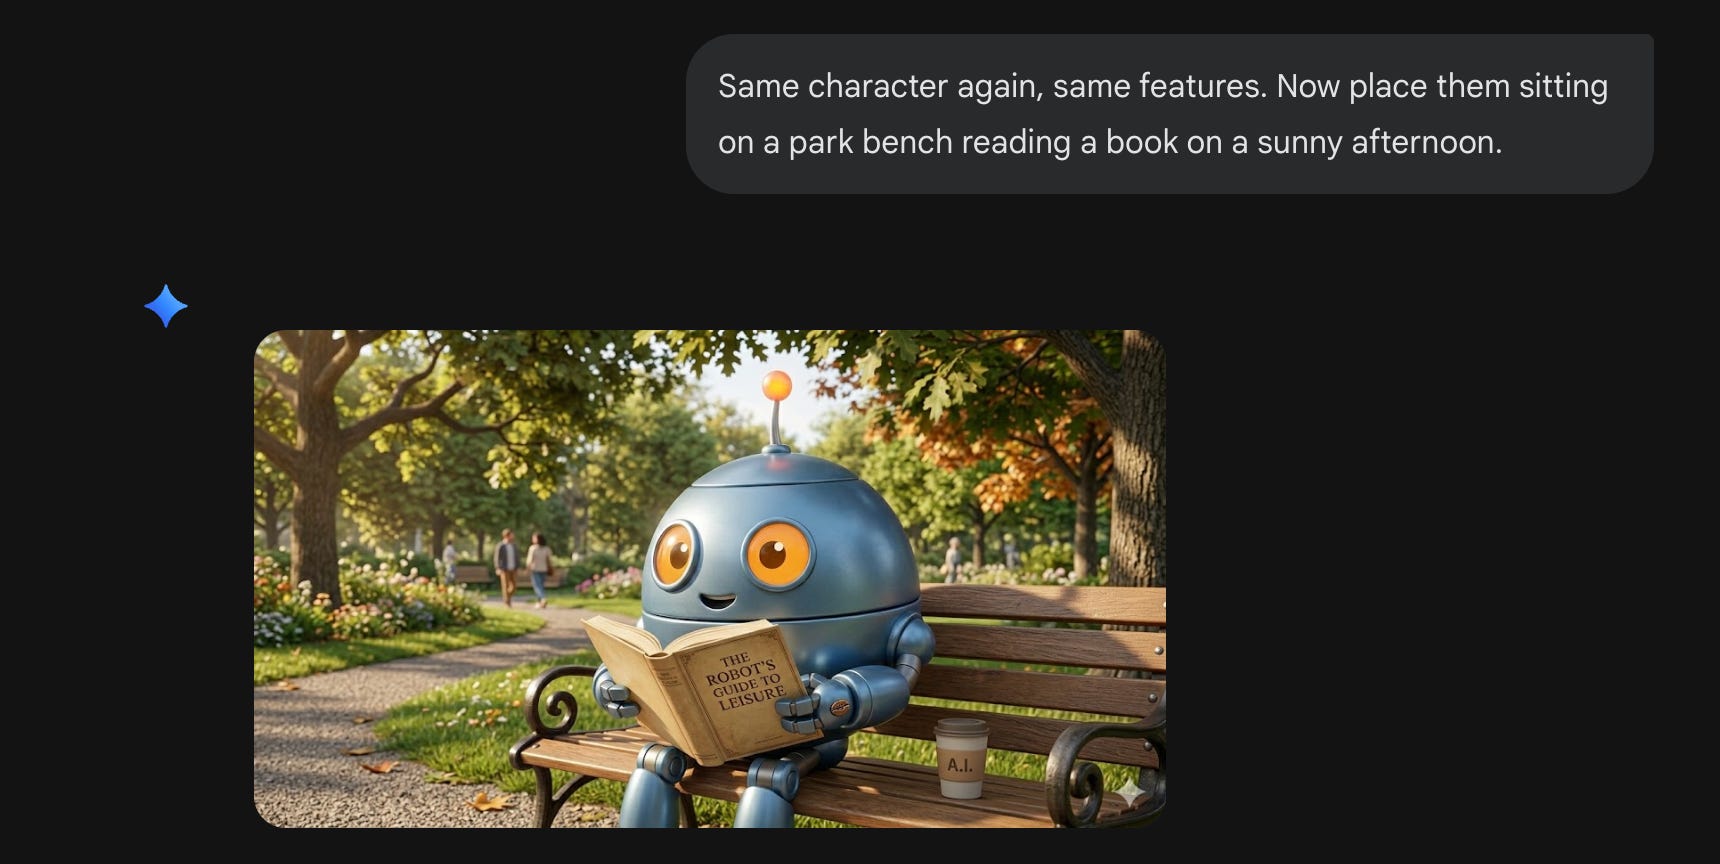
Send these sequentially in the same conversation. That’s the key: same conversation maintains consistency.
Part 4: Creative exploration.
Alright. We’ve covered the serious stuff. Client deliverables. Social media at scale. Business scenarios.
Now let’s have some fun.
The next few scenarios aren’t about saving time or impressing clients. They’re about curiosity. What happens if I turn this photo into a Ghibli scene? What does my face look like as an action figure? What if I reimagine this in a completely different art style?
Just you messing around with a free tool that happens to be insanely powerful.
And honestly? That’s how most people discover uses they never planned for.
19. Style transfer.
Take any image and transform its entire visual style.
Copy this prompt (update the text inside [ ] as per your requirement)
Reimagine this image in the visual style of [style/genre/era]. Maintain the original composition, subjects, and layout — but completely transform the rendering, color palette, textures, and artistic feel to match the new style.“Reimagine this image in the visual style of retro 1970s hand-painted Hollywood cinema posters. Maintain the original composition, subjects, and layout — but completely transform the rendering, color palette, textures, and artistic feel to match the new style.”
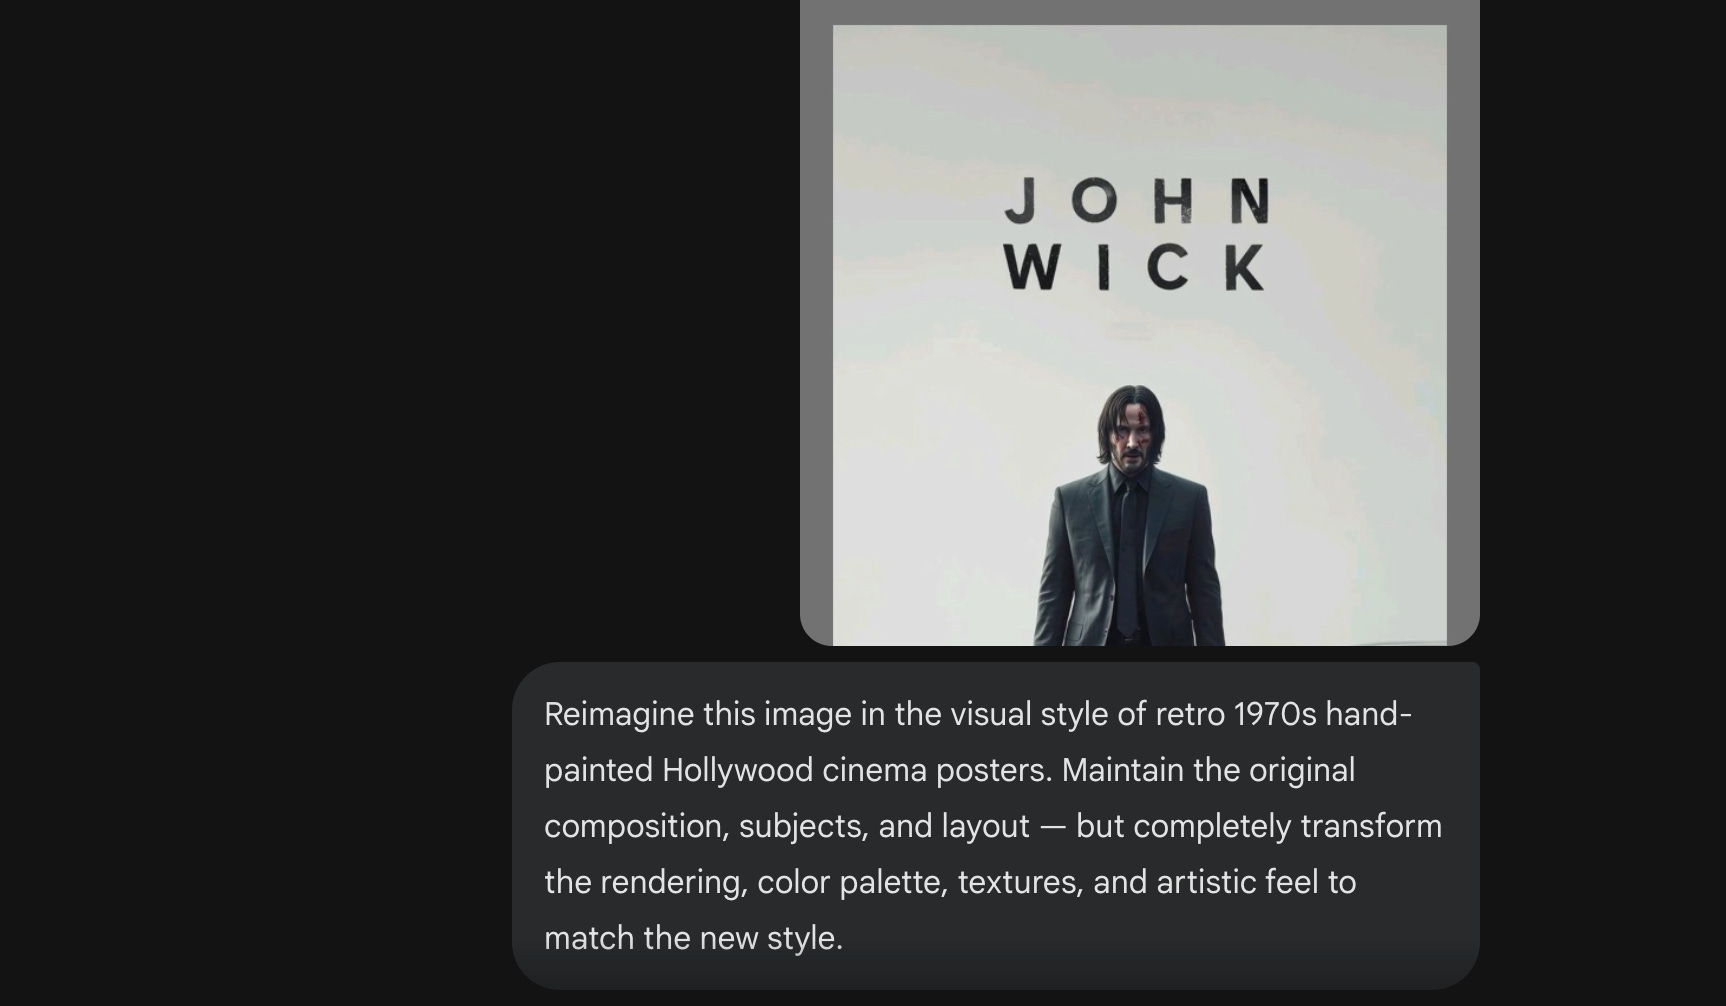
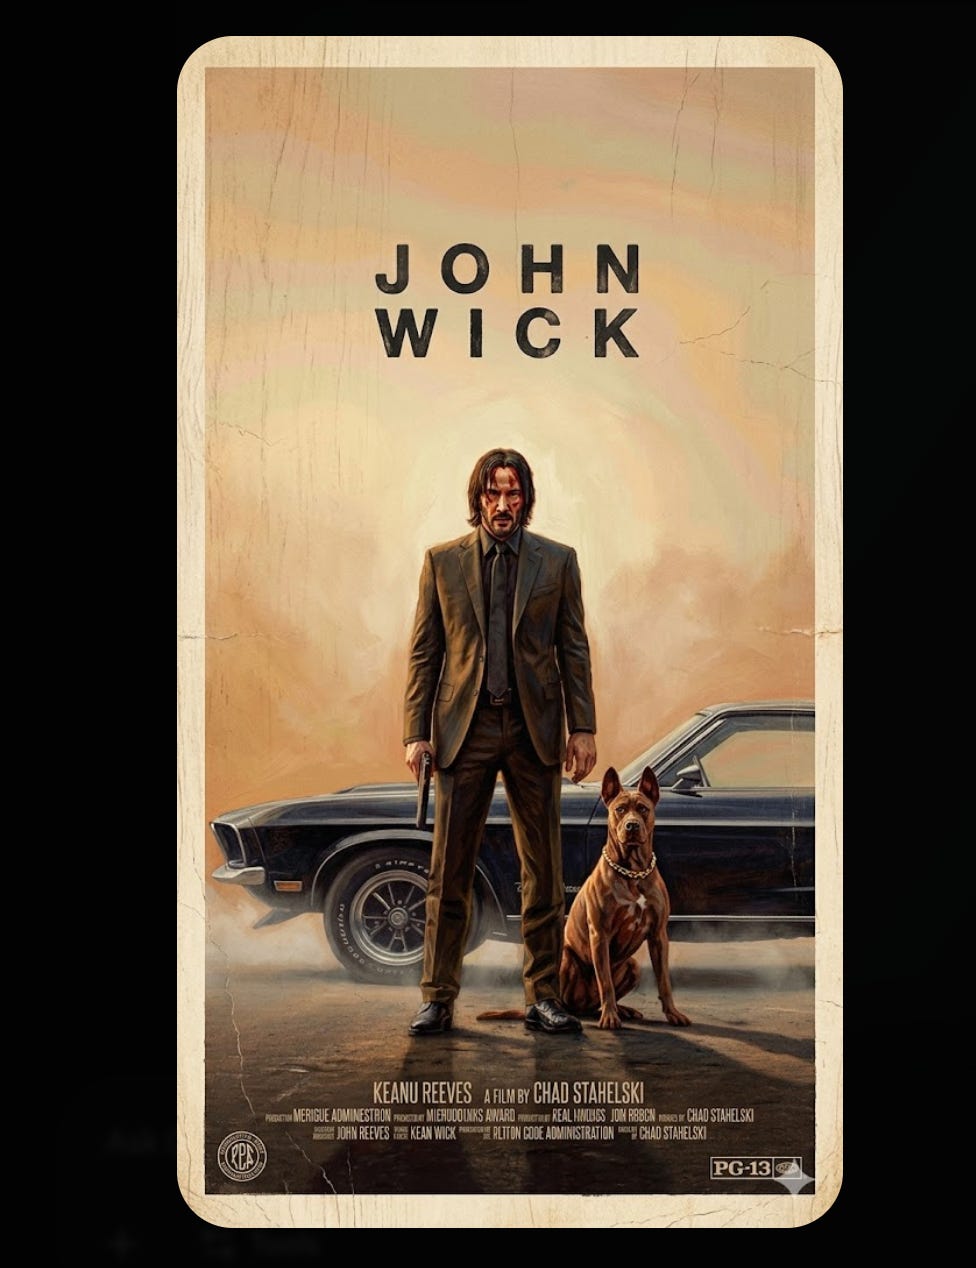
Other styles that work well: Studio Ghibli anime, cyberpunk illustration, 1960s psychedelic poster art, watercolor painting, charcoal sketch, vintage Kodak film grain, flat vector illustration, baroque oil painting, Pixar 3D render.
Great for pitching creative directions to clients. Show, don’t tell.
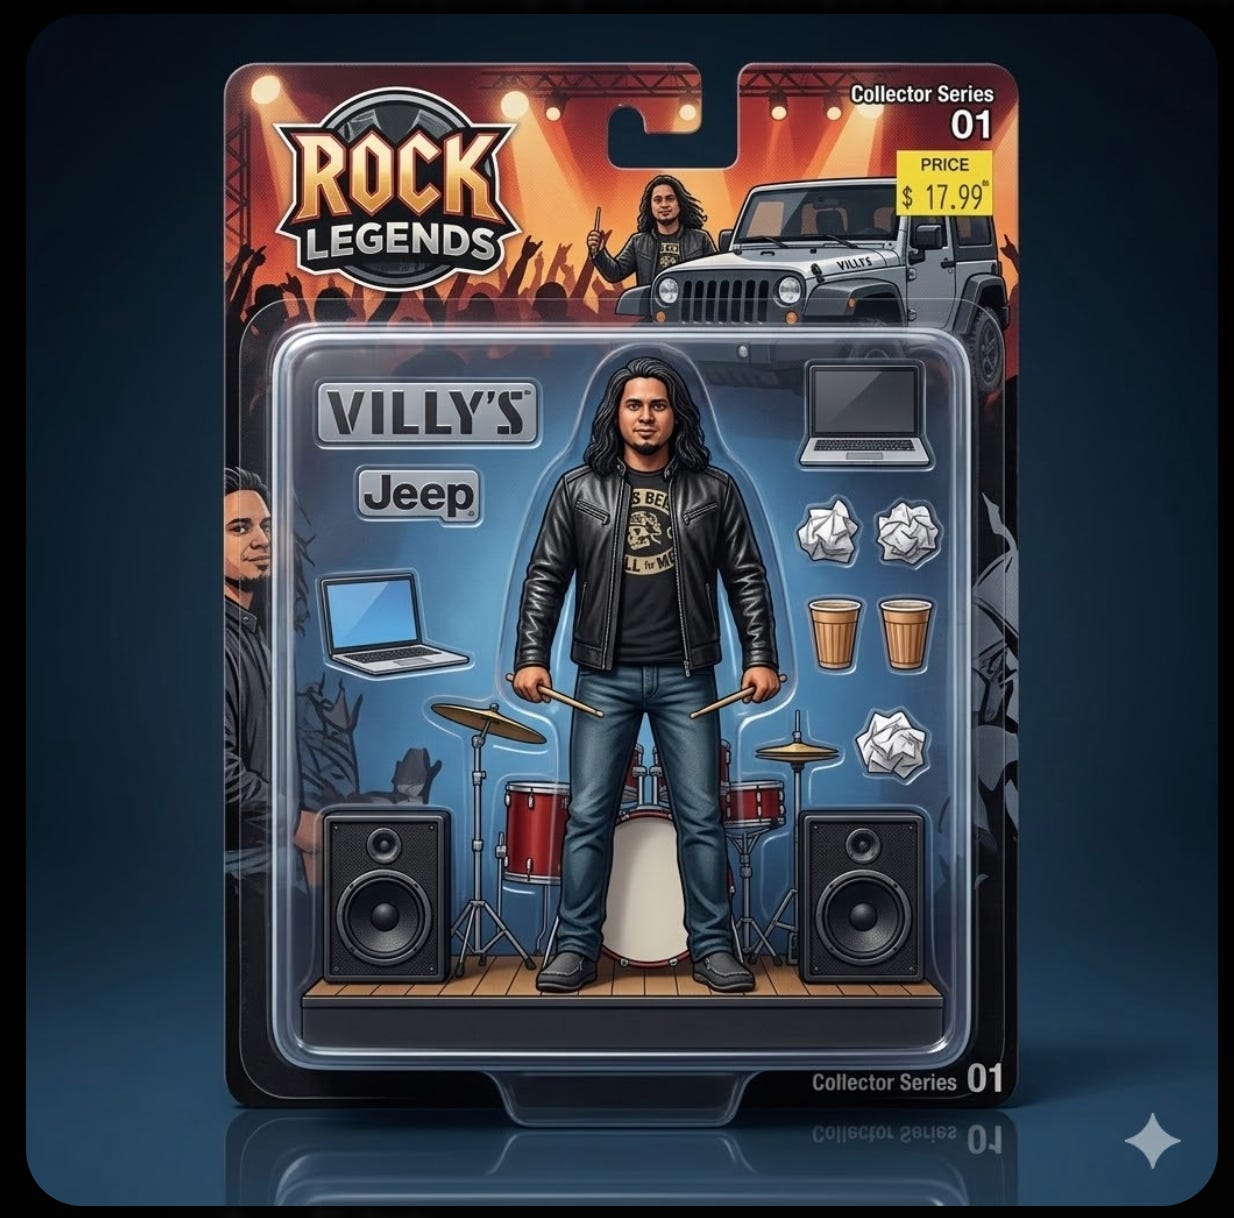
20. Custom figurines.
You’ve seen these everywhere on social media. Everyone turned themselves into a toy.
It went viral because it hits something personal. It’s you, but miniaturized, boxed, and packaged with tiny accessories that tell your story.
Upload your picture and then:
Copy this prompt (update the text inside [ ] as per your requirement)
Turn the person in this photo into a hyper-detailed collectible action figure still inside sealed blister-pack packaging. The figure should be posed in a scene from [situation/moment]. Include miniature accessories that match the scene. The packaging should have a toy-brand feel with a clear plastic front window.“Turn the person in this photo into a hyper-detailed collectible action figure still inside sealed blister-pack packaging. The figure should be posed in a scene from a heavy metal concert. Include miniature accessories: a tiny laptop, a stack of chai cups, and crumpled paper balls. The packaging should have a toy-brand feel with a clear plastic front window.
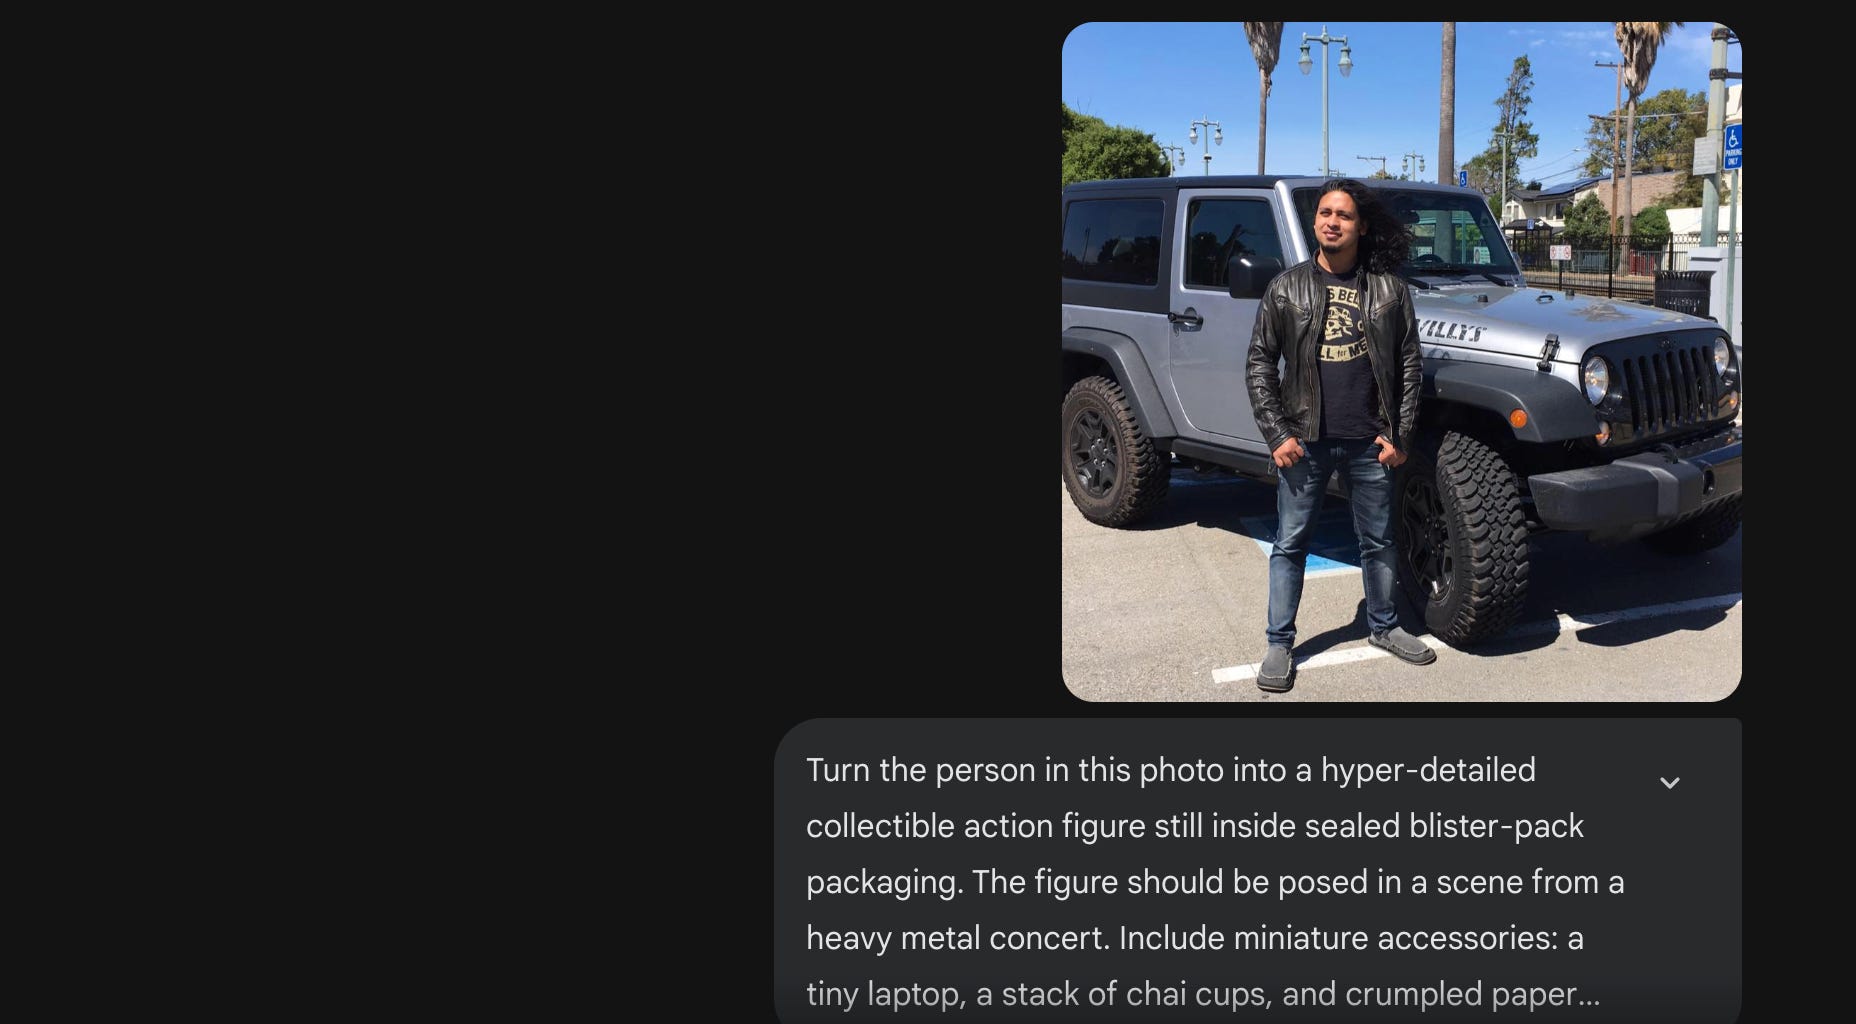
Sure, it’s fun. But fun content travels.
Nobody shares a headshot. Nobody forwards a corporate photo. But a miniature action figure version of yourself with weirdly accurate accessories? That gets screenshotted, shared, and talked about.
And anything that makes people stop scrolling and say “wait, how did you make that?” is doing a lot for your personal brand.
My honest take.
I’m not going to pretend this replaces a graphic designer.
It doesn’t.
What it replaces is the waiting. The stock photo searching. The mockup generation. The “let me quickly visualize this concept” step that used to eat hours.
The real value of Nano Banana 2 isn’t any single feature. It’s the combination. Photorealistic generation + text rendering + editing + upscaling + character consistency, all free, all in one place.
Most AI image tools do one of these well. This does all of them.
The people who’ll get the most out of this aren’t the ones who generate one cool image and post it on social media.
It’s the ones who integrate it into how they actually work. Every day. For real deliverables. For real clients.
That takes practice.
And it starts with trying 5 of these prompts this weekend.
Open Gemini. Pick five. Run them.
That’s it. That’s the whole action item.
P.S.: If you have implemented scenarios that are not covered here, please leave them in the comments section. I'd love to see and add them to my list.